Pages

Showing posts with label Artwork. Show all posts
Thursday, January 25, 2018

The Roman Alphabet

The Roman Alphabet

The Blackletter alphabet was very easy for me.  This is why I felt the need to take on a challenge.  The Roman alphabet gives just that.  This may be, for me, one of the hardest style to do.  There is no way to ensure correct spacing, as it is done by the eye (Bennet 118).  Not only that, you also have to add serifs to the letters.  However, hard work pays off and I was very proud of the end results of the alphabet. 

The spacing between the letters of the Roman alphabet may be the hardest part of it all.  As Bennett writes, "The problem is complicated by the fact that measuring and putting equal distances between letters won't do the trick" (Bennet 118).  If you try to put the same amount of spacing between the letters, they will look like they are spaced unevenly and sloppy because of the shape of the letters themselves.  Just like I have suggested for the previous styles of writing, you may want to use a nib width so that you can focus your attention on not only making the letters formatted correctly, but also looking at how the spacing should be.  The nib width will help you see how the the different letters need different types of spacing.  Personally, I didn't use the nib width at first since I wanted to give myself a challenge.  Don't feel hopeless if you need the assistance of the nib width, with practice you will become less and less dependent on it.  Some key advice is to make all the white spaces between the letters seem equal in length,  even though in reality you placed them in unequal distances.  The letters with straight sides need more space and the rounded sides need less space (Bennet 118).  Using these techniques were a little hard at first, but after using them for about five letters, they became very easy,

The serifs are also a bit of a challenge that come with this alphabet,  The serifs need to be placed in the correct positions and have to be not too big or too small.  The best part is that there are different types of serifs, so you can experiment the one that is the easiest for you to make.  The first is the Slab Serif, the one that I use and find the easiest.  The Slab Serif is made after the letter has been draw and is just a straight line (Bennet 118).  There are also joined Slab Serifs that are drawn as the letters are being written.  These serifs should be made with 20 degree pen angle (Bennet 118).  Finally, there is the Pedestal Serif.  This serif is just like the Slab Serif, except instead of a straight line, there is a curved line.  Finding a technique that is the easiest for you will help make your life a little easier while doing this technique. 

I enjoyed this style of Calligraphy since it gave me a challenge that I didn't get before using the other styles that I've tried throughout this journey.  What style was your favorite?

Bennett, Jim. Calligraphy for Dummies. For Dummies, 2007. Print.
Sunday, January 21, 2018

Using Line Variation in Your Art

Drawing with patterns and certain shapes can help add element to your artwork. Not only does it add variation to the style of artwork you produce, adding patterns can actually make the process of drawing simpler. "Strengthening your manual dexterity will improve your confidence and ultimately appear in the quality of your marks" (Sherman 24). What Sherman means by this statement is, by using simple patterns and textures of lines in your artwork, you can overall improve in that skill.

On the right and left are examples of  textures and variations of lines shown in Playing with Sketches. To complete this exercise, I used some of the patterns shown in the book to make unique characters.


Sherman states, "You will have the endurance to maintain a consistent line quality and the flexibility to easily change your line work, bringing variety to your image," (24). Overall, this exercise was simple and fun. Those who want to add variety to there artwork should try incorporating line variation.
Do you think using different line textures/variation makes art more interesting? 
Bicknell, Sarah. Sherman, Whitney. Playing with Sketches. Beverly, Rockport Publishers, 2014.


Using Other Senses to Draw

Blindly drawing is a very difficult task, it involves using all senses except for site to draw. Whitney Sherman states"Use the same technique to to take your mind away from what you think an object should look like and allow your hand to freely interpret shapes," (116). While drawing without looking, you have to use your memory to make something presentable.

Above, is the example shown in Playing with Sketches. The book used lettering rather than just normal drawing, however, since I am looking to improve my drawing skills, I chose to blindly draw.
Drawing from memory, while being very difficult, helps you gain a better understanding of the object you are drawing. "When looking at shapes we readily know, such as letter forms or faces in a slightly rearranged formations, we can observe new relationships in the imagery" (Sherman 116). Overall, I would recommend this exercise to anyone who like to gain a better understanding of a certain object like a face. Personally, while doing this exercise I close my eyes and do not lift my pen/pencil.

Do you think drawing an object blindly can help you draw that object overall better?
Bicknell, Sarah. Sherman, Whitney. Playing with Sketches. Beverly, Rockport Publishers, 2014.
Sunday, December 31, 2017

The Culture Behind the Art


The Culture Behind the Art 


The origami art was originated from japan .The word "origami" comes from the Japanese language. "Ori" means folded and "kami" means paper. "Used as an inclusive term for all folding practices, regardless of their culture of origin. The goal is to transform a flat square sheet of paper into a finished sculpture through folding and sculpting techniques" (Shaffer 11).  Origami is the art of paper folding, which is often associated with Japanese culture.  Origami folders often use the Japanese word refers to designs which use cuts.


Folding pieces of paper was a valuable gift used in japan. "When origami was first practiced, however, it was a craft only for the elite. Japanese monks folded origami figures for religious purposes. Origami was also used in various formal ceremonies"(Shaffer 12).
ceremonial paper folding were important, these models would act as a certificate of authenticity. As paper became more affordable, common people began making origami figures as gifts or creating folded cards and envelope. 


Can origami still carry that deeper and cultural meaning or was it lost due to its wide population throughout the whole world?

Shaffer, Jeremy. “Origami to Astonish and Amuse.” Amazon.com, 6 July 2001, www.amazon.com/Origami-Astonish-Amuse-Jeremy-Shafer

Wednesday, December 20, 2017

The Benefits of Drawing With Your Non-dominant Hand

"Relying on my memory of forms, I challenged my unskilled 'other' hand to recall those shapes. The goal was not to get better at drawing with my non-dominant hand, though in short order I could see improvements. The goal was to see my accidents, memorize them ... and overall look of my artwork," (Sherman 68). According to Sherman, as difficult as using your non-dominant hand is, it can be very useful for recognizing your stylistic mistakes and common mess ups you make in your artwork. Below are some examples of art shown in the book that compare and contrast dominant and non-dominant hand drawings.


"By using your non-dominant hand, you will discover a new language for your line and form," (Sherman 68). To attempt this activity I used my left hand to draw a person, like shown in the book. Although this exercise is about improving mistakes rather than just learning to draw in certain way, I was pretty impressed with what my left hand can draw.
I would highly recommend others to try this activity if they have basic drawing skills (because is will admit, this is a lot harder than normal drawing). I definitely enjoyed drawing in a new way, so I will likely try this again.

My question is, Do you guys think using your non-dominant hand to draw, can help you improve your artistic skills?
Bicknell, Sarah. Sherman, Whitney. Playing with Sketches. Beverly, Rockport Publishers, 2014.


Thursday, November 30, 2017

Don't Wander- Observe

Museums hold the greatest pieces of art known to man. The art ranges from different values and different styles, and each piece has its own unique connotation and creative outlook on the world. The museums in themselves that holds these masterpieces, how ever, only seem to have one purpose and one activity- a place where we can wander around looking at art. Johan Idema stated, "We turn into better observers when sitting down" (23). sitting down simply allows us to focus more, as our brain isn't focused on standing, but rather on the things happening in the world around us.

Museums are often seen as boring, as you simply feel like the only thing to do is to walk around and look, but you can always do more then that. Scattered through out museums are benches and places to sit, not simply for you to have a place to relax if you get tired of walking, but to give you the opportunity to slow down, and look. Idema explains how having benches and furniture around the museums makes us feel like we are at home and rather than a museum, and slows us down to process the art that we are looking at, and allows us to try and come up with what the art means to us.
When applying this technique, I felt as if I wasn't being as rushed, and I had more time to absorb the art and take in the details of the pieces. It made me appreciate the pieces of art more. I found it much easier to pinpoint what I exactly liked about a certain art piece. Combining this with walking up closer to the paintings afterward, it also allowed me to enjoy the art more, as it gave me a different point of view while looking at the art.

How do you feel like this could be applied to your everyday life, and not just a museum?

Idema, Johan. How to Visit an Art Museum: Tips for a Truly Rewarding Visit. BIS Publishers, 2014

Sunday, January 29, 2017

Wild Flower Pencil Topper

For my last blog i  will be demonstrating how to make adorable "Quick and Easy" (Wallenfang, 10) Wild Flower Pencil Topper(s).


Materials Needed
Duct Tape ( Assorted colors, Prints are optional)
Scissors
Pencil(s)

Steps:
1. Make an offset strip (Wallenfang, 7) for petal. Make another 1 in a different color for the fringed center.

2. Make a double-sided (Wallenfang, 7) strip for the leaves. Freehand cut the petals and leaves

3.Wrap pencil(s) with chosen tape, Wrap and tape the Fringed center around the pencil.

4. Finish of with taping the petals and leaf to the straws.


What changes have you made to crafts and how did they turn out?


Wallenfang, Patti. Just Duct Tape It! Little Rock, AR: Leisure Arts, 2011. Print.
Saturday, January 28, 2017

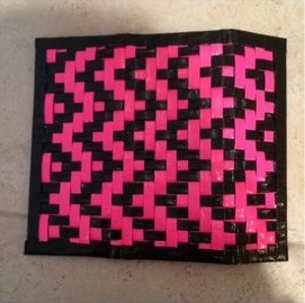
Duck Tape Clutch/Wallet

 Hello Bloggers!


Today I'am going to be posting about how to create a quick and easy clutch made from a duct tape.


Materials
2 Colored Duct tapes
Scissors
Hook and loop Fastener (OPTIONAL)


Steps
1.  Make a 7 1/2" X 11 1/2" double-sided sheet (Wallenfang, 44), with a colored tape. Cover the edges with second tape.
2. Bill Holder: Make a 7 1/2" X 3" double sided Sheet; tape to the clutch inside.
3. Card Pockets: Make a 20" Double-sided tape strip ( Wallenfang, 7). Cut 6 Pockets and cover the Edges.
4. Tape the pockets together; tape each  pocket separately.
5. Tape the Pockets in place
6. Fold the clutch in thirds and add the hook and loop fastener ( OPTIONAL)


What kind of combinations have you made in a craft? if so how did it turn out?

Wallenfang, Patti. Just Duct Tape It! Little Rock, AR: Leisure Arts, 2011. Print.

Saturday, December 31, 2016

Mini Banner

Hi bloggers! I hope you're enjoying your last days of winter break. For my last blog this month i will be creating a mini banner you can use for your locker or as accessory to your room.

Materials:

  • colored duct tape ( 1 or more)
  • 1/8 inch wide ribbon or string
  • scissors
  • permanent marker or paint pen                                                                                                                                         
First gather all the materials, then make and offset double side strip (Wallenfang, 7). Make sure the tape is four and half inches long (Wallenfang, 26)
                                                                                  
The second step is to trim away the 1/2 inch sticky side that's up, then fold over and stick the sticky side that's down to create the ribbon tunnel (Wallenfang, 26).                                                                                                                             

Third step; trim the pennant shape with scissors.


Repeat all three steps for the next pennants ( depending on what letters you want to put on the banner).

Fourth and final step, thread the pennants onto the ribbon/string; add the letters with a paint pen* in my case i'll be using a black sharpie* (Wallenfang, 26).


What kind of changes/alterations have you made in a craft work? if so were you successful?


 Wallenfang, Patti. Just Duct Tape It! Little Rock, AR: Leisure Arts, 2011. Print.
Wednesday, November 30, 2016

Drawing for the Absolute Beginner


Art is a hobby that I aspire to become relatively good at because I want to be able to draw my favorite characters (to not turn out rubbish) and I really admire art in general. To accomplish this goal however, I have to start with the basics. Upon reading Drawing for the Absolute Beginner by Mark and Mary Willenbrink I learned that there is a difference between sketching and drawing. “A sketch is a work in progress. You may sketch to observe your subject matter or to resolve questions regarding a drawing you are working on…On the other hand, drawing is an activity that is begun with the intention of producing a finished piece of art.” (Willenbrink 14). Before reading this, I would jump right ahead to drawing rather than starting with a simple sketch.

For my first drawing I have chosen to sketch and draw a cat. I followed the first step which was to sketch out basic shapes (70).

Using this first step was a guide to the following instructions that came next. Refining, rounding, and creating details was easy because I had a sketch as a guide. I would’ve gone straight to making the eyes, face, and details right away if I hadn’t known any better.
Final Product:

From this first experience I have learned that it is very helpful to sketch basic shapes which will ultimately help guide form a feature (for example: the cat’s eyes). I also learned that it is recommended to do more sketches, and to do them before you start drawing. It serves as practice and helps you become more familiar of structures and proportions.

Question: Is art a skill that is achievable through hard work and lots of practice? Or is it a skill that some people are simply born with?

Willenbrink, Mark, and Mary Willenbrink. Drawing for the Absolute Beginner: A Clear & Easy Guide to Successful Drawing. Cincinnati, OH: North Light, 2006. Print.

The Complexity & Simplicity of Abstract Art


"With abstract art I can create in the moment." -Peggy Guichu

          Among the great abundance of languages that exist in our complex world, one that can be understood by all is the language of art. Art is such a wonderful thing. With each new idea that blooms within an artist's mind, it holds the capacity to create new forms of beauty that are truly indescribable. Whether it be through painting, literature, or music, art has the ability to make you feel. And with that, I've chosen Abstract Art as my activity for this quarter's IRP. 

       Abstract art is the act of using multiple components to create a composition that does not reflect our actual visual reality. When drawing, before I even begin to start a piece of art, I make sure that I have a clear plan set out for what I will create. I ensure that measurements and details are all sketched out. However, according to Stewart, this is what you DON'T want to do. In abstraction, you must let go of the outcome and be open to change along the way (Stewart 26). Keeping this in mind during my activity, I found that the text completely rewired my brain and the process that it usually went through when drawing. It impacted the pressure of my strokes, the colors that I used, and the finish product. As I drew, I saw that I was working only based on what I was feeling. I used dark, expressive strokes as well as soft, happy ones, following no outline throughout. This impact on how I drew was reflective of Stewart's tip of letting go of the outcome because to draw without an outcome in mind usually requires you to follow some sort of procedure, something I excluded to make my piece abstract. In addition, the text impacted the direction that I took when drawing. At the beginning, I decided that I would stay consistent to a darker color scheme. Applying Stewart's advice that I should keep an open mind to change, I decided to then do so and add a contrasting lighter color scheme on the right side. The text impacted my activity by adding much more interest to my final product.


Before

       Along with that tip, there are 4 basic components of abstract art: line, shape, texture, and color, that you should also keep in mind (Stewart 46). Regarding the element of shape, Stewart says, "You can use shapes as a way to divide the picture plane. Having variety in shapes within a composition adds interest" (Stewart 45). While I drew, Stewart's insight had made an impact on the entire direction of my piece. Keeping in mind that variety would add interest, Stewart's tips encouraged me to use 2 shapes that looked very different, triangles and circles. Along with that, the text further impacted my drawing because I then focused on making each triangle vary in size, dimension, color, and texture, and for the circle drew it very large so that the variety of shapes would be more apparent. In addition, Stewart also impacted my activity by giving me the idea to use triangles and circles to create division in my piece. As you can see below the triangles mark the left division and the circles mark the right division. 

 Even if the end product turned out pretty bad, through the text, Stewart helped me improve my art skills by broadening the approach I take when it comes to drawing. Thanks for reading! :)


After

Picture of me drawing


"Hope"


What is your view on art? :) What is your favorite form of art? What types of art do you create? Would this be something you might want to try?

              Stewart, Debora. Abstract Art Painting: Expressions in Mixed Media. Cincinnati, OH: North Light,               2015. Print.