Pages

Showing posts with label paper craft. Show all posts
Wednesday, January 17, 2018

Stealth Jet

Building my first paper airplane in the book gained me confidence to try one in the harder skill level. it was called the "Stealth Jet." As I was flipping through the pages, it quickly caught my eyes. It looked unique with the front side pointing out like two horn. I couldn't miss the opportunity. The description said, "This jet is a classic and has been made by paper plane enthusiasts for generations. it is known as the '"Squid Airplane"' in Japan because its shape looks like a sea squid!" (Ono 22). Of course, I thought it looked like horns but after reading the description it looks more like squid than anything else. But anyways, this was my attempt for the "Stealth Jet."


The Paper Design:
The paper was about 8x6/21x15 cm. The color combination between dark green and light blue was nice, one of the reasons why I chose this plane.


First Step:
"Make a crease along the center of the paper by folding the colored sides together. Open out the sheet and fold two corners to meet along the central crease" (Ono 22).
From my experience on the "Classic Airplane." My precision to fold both sides has become a piece of cake.


Second and Third Step:
"Turn the paper over and fold both angled edges in to meet along the central crease" (Ono 22).


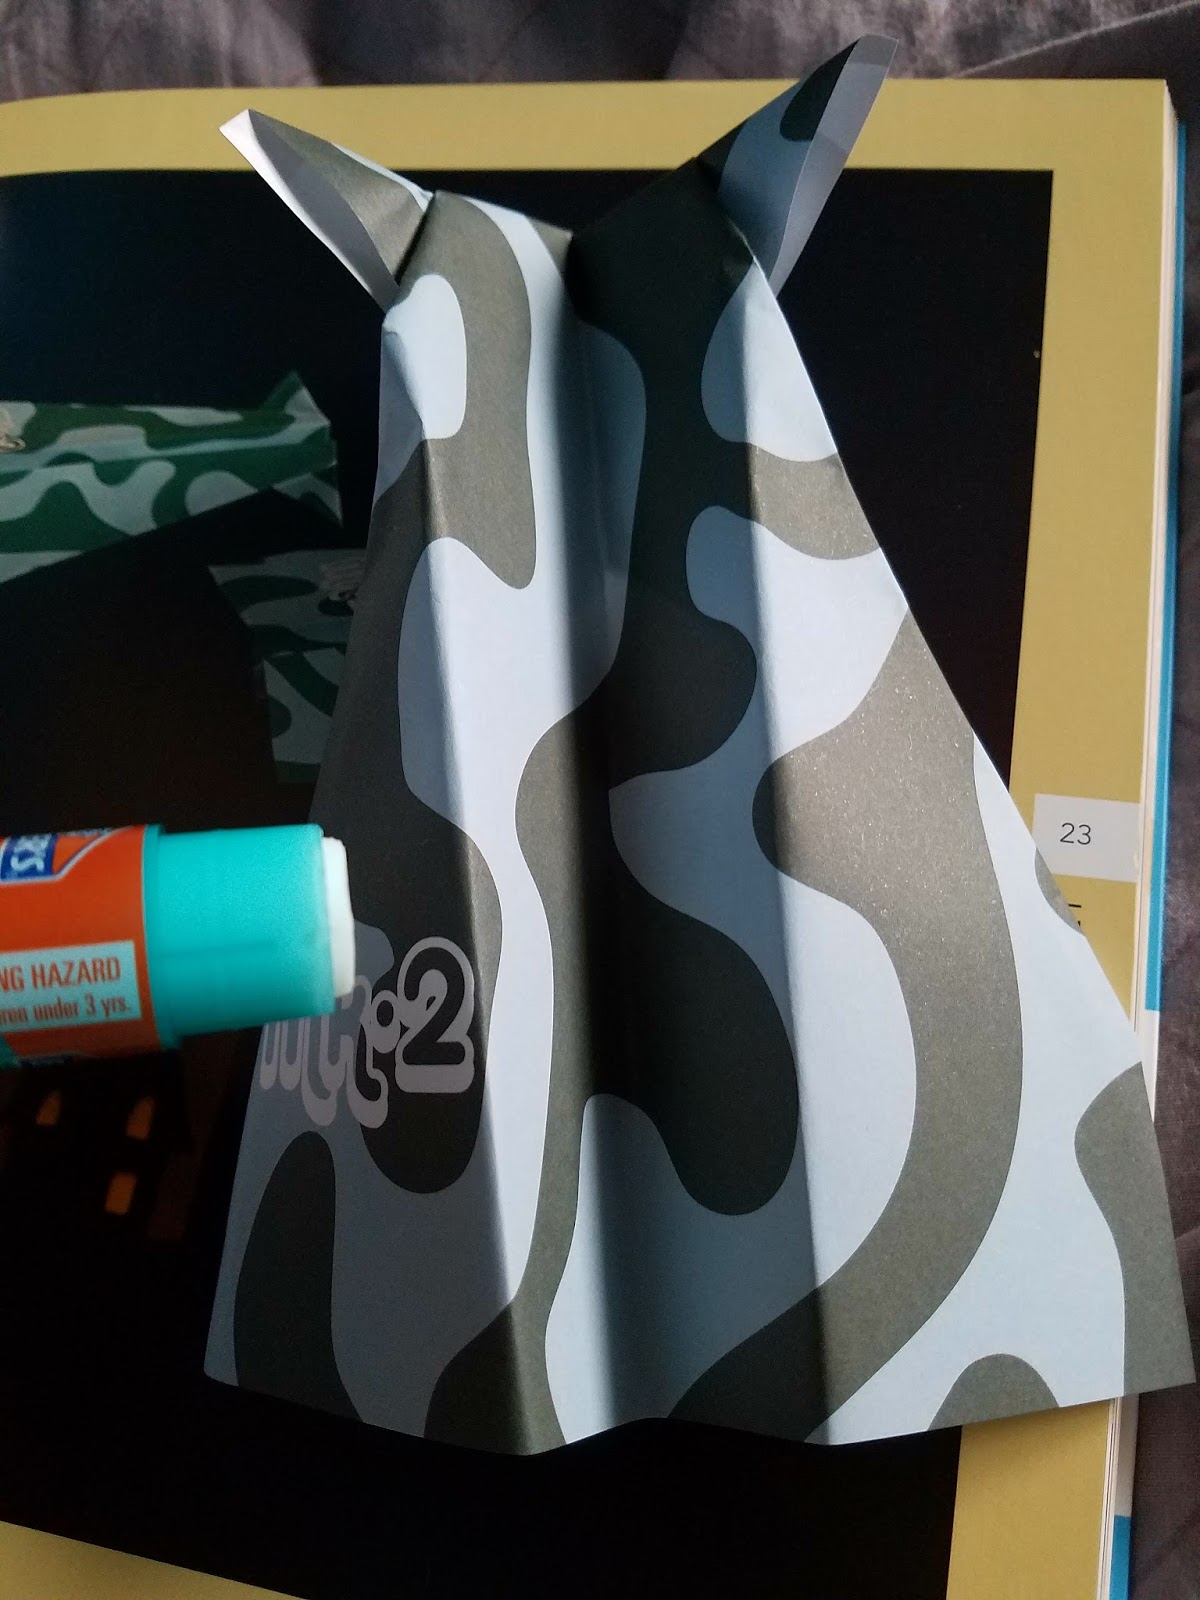
"Lift up the object and open out the two loose flaps of paper at the pointed end" (Ono 22).
I accidentally skipped this part and went to step 4 which explains the several creases on the paper but I was still able to do it!


Fourth and Final Step:
"Turn back the pointed end making the fold between the two outer points then lift the object and fold it in half along the central crease" (Ono 22).


"Lift the top flap forward to make the wing, making a straight fold about 1/2 in (1.5cm) up from the bottom. turn the paper over and repeat, then place a little paper glue in the space between the wings and press together" (Ono 22). I noticed gluing between the wings was the most important step of the whole design if not added, it wouldn't even like a paper airplane at all! But after gluing it together, the plane was complete and it looked really unique


              Final Design 
Not going to lie, I messed up a little when going through the steps but in the end, I was able to finish. It obviously doesn't look exactly the one I saw in the picture but it was solid. Even if you fail, just keep trying and it will pay off


Have you ever felt so frustrated that you wanted to quit but still kept going until the very end? If so, how did it feel?

Ono, Mari, and Roshin Ono. Fly Origami Fly. Edited by Robin Gurdon, illustrated by Trina Dalziel, Cico Books, 2010.


The Classic Airplane

After learning a few tips from the book. I finally begin to start my first Paper Airplane. It was called the "Classic Airplane." I figured to start on the most basic one so I could try to get a good feel before starting on the other crazy ones. It had a caption which a part of it said, "This classic paper airplane is a model that has been much loved for generations because it flies very well even thought it is so quick and easy to fold" (Ono 18).
                                                                       

My Design:                                                                                                       I've decided to use this paper design to build my first "Classic Airplane" because I noticed this was the only paper that didn't have a specific type of Paper Plane for it.    


First Step:    
"Make a crease down the center of the paper by folding it in half then opening it out again. turn in the corners of one end of the paper so that the sides lie along the central crease with the corners next to each other" (Ono 18).
Like any other airplane, this comes to no surprise to crease it down the center of the paper since it is called the "Classic Airplane."
I am able to do this easily.


Second Step:        
"Fold the new edges in so that they also meet along the central crease" (Ono 18).
Again, I had no problem doing the step of the instructions. The tips from the introduction helped me get an accurate fold.                                              


Third Step:
"Turn back the nose, folding it about 1in (2.5cm) from the end, then turn the object over and close up the plane along the original crease line" (Ono 18).
After this step, I made sure to flatten the paper with a textbook to avoid the paper from hanging out so I didn't have to use my hands to press it down.

Fourth And Fifth Step:
"Turn over the wing at a slight angle so that the plane's body is deeper at to back than the front" (Ono 18).
"Turn the plane over and fold down the other wing so that is exactly matches the first then open out the wings so that they sit together, at right angles to the body" (Ono 18). I didn't feel the need to add any pictures for the last two steps because it was pretty self explanatory.


Do you enjoy doing origami? Why or why not?


Ono, Mari, and Roshin Ono. Fly Origami Fly. Edited by Robin Gurdon, illustrated by Trina Dalziel, Cico Books, 2010.


Tuesday, January 31, 2017

The golden seal lion

    For my final post, I decided to use a gold sheet of  origami paper to make my seal lion, from the book under the sea origami by Duy Nguyen. Under the sea origami has taught and shown me the different animals that I can create with origami paper. All of these animals I have never done before, but I have done certain folds that the book teaches and shows how to make such and such folds. But overall this book has enhanced my overall knowledge of origami, in the past I never knew the proper names of certain folds. But with book i now know more and the name of folds.

To make a origami seal lion, you must know the following folds: mountain fold, valley fold, outside reverse fold, squash fold. (Nguyen 30).

Making the seal lion was easy, even though I may had of have some issues getting the creases and folds perfect so that it all comes together very neatly. Especially with the gold origami paper, it is very fragile so I had to extra careful with the folds and creases. Some parts that I trouble with was doing "outside reverse fold". (Nguyen 8). I thought that I had missed a fold while making the seal lion so I redid it, but I just really had to was fold the tail inwards. Overall i did enjoy making the seal lion, espcially in gold.

Nguyen, Duy. under the sea origami. New York: Sterling Publishing Co., Inc, 2004

Do you prefer using a specific color when making an origami figure? 


Sunday, January 29, 2017

Origami Piranha

There are many creases in origami, there are many folds in origami, each fold should be as perfect as the last one. In the book. Under the sea origami by Duy Nguyen it shows and teaches you how to do such folds such as Inside crimp fold, or the inside reverse fold. (Nguyen 7).

To make an amazing piranha, you need to know the following folds, squash fold, mountain fold, inside reverse fold, and squash fold one, and pleat fold reverse. (Nguyen 6) and (Nguyen 8).

In the making of the piranha it was very challenging, making the piranha eyes was challenging because i didn't know how to small a pleat "fold reverse". (Nguyen 8). Making this fold made me very frustrated because the fold would crease all the way. And also having to do this for the other eye go me upset having to do this fold again that i couldn't complete the first time. Even though i did have difficulties making certain creases. Making the piranha was a fun and a great new experience in making something that is diffitcult.

Do you like making different varieties of origami figures?

Nguyen, Duy. under the sea origami. New York: Sterling Publishing Co., Inc, 2004


Origami Squid

    In the book, Under the sea origami by Duy Nguyen, he starts of the book with very basic and with essential folds that will help in making wonderful sea origami animals.

To make a squid you must know the following folds, valley fold, squash fold, mountain fold, and the pleat fold. These folds can found in the basic fold section. (Nguyen 6).

When I was making the origami squid it was farley easy and fun to make. The challenge I had when making the origami squid were "pleat fold" and "pleat fold reverse". (Nguyen 8). This part was very confusing to due to the fact that one side had to be a pleat fold but the other side had to be reverse pleat fold. I didn't realize the first time why I was doing it wrong. Due to one side only have one flap and other not having a flap. Even though I had issues making the origami squid I found it to be enjoyable and seeing how it turned out at the end.

What is the most diffitcult origami figure you made?

Nguyen, Duy. under the sea origami. New York: Sterling Publishing Co., Inc, 2004


Origami Dragonfly

Today I decided to create an origami dragonfly. The steps for this design was pretty simple, but was still fun to create. It was a unique design with many folds I have never tried before. the origami dragonfly began with the basic bird base, which was the same starting base for a paper crane.


After that, there were many steps that required you to fold the corners into small pockets in order to create a different shape for the wings (Kasahara 32). One of the steps stated "Roll up [the triangle] to create its head" (Kasahara 32). These folds were unique to me and it has allowed me to learn some techniques that may be helpful when I create other origami designs. The origami dragonfly was different from other creations I have made before because of how it has depth in its folds. Overall, this origami design was very fun to make and has taught me new folds that will be useful in the future.


Question: Have you learned new folds through making origami? Which one and from which origami design?

Kasahara, Kunihiko. Extreme Origami. New York: Sterling Pub., 2002. Print.
Friday, January 13, 2017

Origami: Keep it Simple

Sometimes, origami should be kept simple. Not every origami is meant to be complex and look detailed with hundreds of folds, some can just be small and beautiful with its own aspects and simplicity. Today, I decided to create an origami Orizuru, commonly know as the original crane. It was one of the first origami designs I began to become interested in origami. The design is very simple and is one of the designs that represent origami to others. "This beautiful, traditional design has been known since 1797, the year of the book Senbazuru-Orikata (A Thousand Origami Cranes) was published" (Kasahara 31).

I began my crane with a normal piece of square paper and followed the basic steps to create the basic bird base. The steps were very clear and did not require too much thinking, perfect for beginners.
From the bird base, there were a few more instructions that included a lot of creasing and unfolding (Kasahara 41). These steps were very helpful as it made it very easy to fold up many folds that would have taken more time, or even ruin the clean and crisp look of the crane. The origami crane was finished off by spreading and curving the wings out to give it a 3D shape. The outcome turned out great and looked like the cranes in the book. Overall, I had learned that making every required crease can help out and save a lot more time than skipping the small tedious steps.


Question: Is creating complex origami that requires a lot more time and effort worth it or is making simple origami a lot better?

Kasahara, Kunihiko. Extreme Origami. New York: Sterling Pub., 2002. Print.
Wednesday, December 28, 2016

Origami Angel Fish

     In the book, Under the sea origami by Duy Nguyen, starts up the book with basic instructions and basic folds that included Kite Fold, Valley Fold. All of these folds are in the basic folds section. 

To make a angle fish you must first have origami paper, can be found at your local craft store. The folds that are used to make the angel fish are base fold three, valley fold, kite fold, squash fold, and mountain fold. These folds are essential in making of the angel fish. (Nguyen 12).

When i was making the origami angel fish was a basic challenge but there were some parts that were confusing for me, which were "Mountain fold layer inward" and "Inside reverse folds". (Nguyen 39). These parts were confusing me because i didn't realize that you must fold the tip back, but i folded the tip forward, by not looking at the steps shown at the basic fold section i wasted time and got very confused when in the first place could have been resolved much more quicker. Even though i do have past experience with origami this shows that there are very diverse folds that can be confusing at times. Hopefully you enjoy my wonderful angel fish.

What folds do you have trouble with? 

Nguyen, Duy. under the sea origami. New York: Sterling Publishing Co., Inc, 2004.