Pages

Showing posts with label dogs. Show all posts
Tuesday, January 31, 2017

Basic Dog Drawing - Great Dane


For my final drawing, I decided to draw the hardest one in the book to test my abilities. This one had so much detail that I knew it was going to be a challenge. Great Danes are also, along with Golden retrievers, one of my favorite types of dogs. When I was younger I had two black and white Great Danes and currently we own a grey and black one named Captain so I knew drawing this would be enjoyable.


The book starts it off simple as always. The first step is, “Draw a pear shape for the main body. Add lines for the neck, and shape the head and ears. Outline the rear legs, then draw shapes for the front legs. (Make sure the front legs are a little longer than the rear legs.) Add a curved shape for the tail” (Green 17). This was mostly easy. The hint to make the front legs longer really helped in the end.


The next step still, was very simple. It was only a little bit of refining which wasn’t that hard. Also, since I had practiced I knew the techniques to do it. The step for refining is, “Refine the outline of the head taking care of the ears and chin. Define the legs and the outline of the tummy” (Green 17). I think that them telling me to focus on the ears and chin really helped me make the drawing look better.


After the first part of the details were done, we really just refined more. We refined the legs, and a bit of the body and added an eye and a nose; “Add shapes for the eye and the nose, and continue to refine the body outline and the legs” (Green 17). I think it helped to split up the refining into two so there wasn’t a ton of changes at once.


In this drawing, the last step was definitely the hardest. The markings on Great Danes are very unique and hard to match perfectly. This step was the most stressful of all the drawings I did and really put the test to the abilities I’ve learned while drawing these. The step was, “Add more detail to the ears, eyes, and nose. Draw contour lines on the neck, chest, and stomach. Finish by drawing large and small shapes for the spot and detail the toes and nails” (Green 17). Again, this was by far the hardest part of this drawing as I had gotten a lot of opportunities to practice the other techniques.


Final thoughts: This was probably my most favorite drawing that I did. I think the details are very good and the overall shape is nice.

Questions: Would you try to draw this? If you drew this, would you add this many markings or take some away? How would you change the drawing?


Basic Dog Drawing - Golden Retriever


Golden retrievers are one of my favorite dogs so I was very excited to start drawing this. I picked this one as my fourth drawing because there were a lot of details which made the drawing harder and also, the position the dog was in was one that I haven’t tried yet. I drew this while taking a break from studying for finals. At that time, I was extremely overwhelmed and ready to burst into tears.


The book “Dogs Draw and Color” by John Green kept the steps very simple even with such a difficult drawing. The first step in the book was, “Begin by drawing a long oval shape for the body. Add a curved outline for the neck and head, and a square shape for the muzzle. Draw a curved shape for the raised paw; add the second front leg and the rear leg” (Green 15). This step was easyish. I always struggle getting the right shape for the body because it’s what everything else is based off of. Everything else went well as it was a simple outline.


The next step was just adding smaller details so it wasn’t that hard; “Refine the shape of the head and muzzle, and add the ear. Shape the raised paw. Add shapes for the rear leg, thigh, and tail” (Green 15). This wasn’t that hard as it wasn’t a ton of detail work yet My recommendation for this step is to make sure everything is in proportion.


The next step was sufficiently harder as the ruffles in the fur were kind of hard to replicate. The next two parts stressed me out a bit as I tried to make sure the dog looked realistic. The instructions seemed simple but they weren’t as easy as it seemed, “Refine the outline of the body and continue to add detail to the legs, the thigh, and paws, emphasizing the feathers outline. Add shapes for the nose and the eye” (Green 15). The instructions were very vague on “details” so I struggled a bit but it didn’t look too bad in the end.


The last step was the most stressful. Details didn’t get very much easier to do so I still struggled a bit bringing my confidence down while drawing. The details added in this part really made the dog come to life so I tried to recreate that the best of my abilities. The last step states, “Add more detail to the nose and eye. Draw the mouth, and expression lines above and below eyes. Draw in feathered lines for the fur, and finish off by adding detail to the toes and nails” (Green 15). Again, some of the instructions for adding details was vague so it was kind of hard to tell what they actually wanted me to do without looking at the picture.


Final thoughts: This was definitely the hardest one I have done so far. The details were extensive and perfecting it was hard.
Questions: If you had to draw any dog, which would it be and why? Would you draw this dog? What would you do to change the drawing?


Drawing - Pugs


As I was drawing and preparing for finals, drawing these pictures helped me forget about the overwhelming amount of work I had to do and things I had to prepare. The way I approached drawing this dog was better than the last times. I felt like I knew what I was doing better this time.


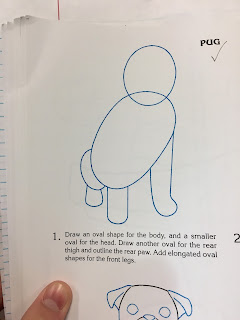
The book “Dogs Draw and Color” by John Green is a good book for step by step instructions. For my third piece, I chose to draw a pug. This was still an easy one but I decided to slowly work my way up and this had more details than the last two. The first step in the book was, “Draw an oval shape for the body, and a smaller oval for the head. Draw another oval for the rear thigh and outline the rear paw. Ass elongated oval shapes for the front legs” (Green 23). This shows the rough outline of the dog. It was really easy to do this part as it had no details and was just simple shapes.


As the steps progress, more details get added. Step two says, “Refine the outline of the head. Shape the ears, and draw in a curved sausage shape to outline the mouth” (Green 23). This step was pretty easy and the language used was one that helped me draw the mouth like it said.


From here, more details are added and the basic shapes from the beginning get refined totally. The book says, “Draw in the eyes and the lower part of the ears. Add the chin. Refine the outline of the dog’s tummy and legs” (Green 23).


 From here, the details are just small ones to make the drawing more real. The book says that to do this you, “Add detail to the eyes and nose, and draw the fold lines on the head and around the eyes. Add broken lines to the muzzle. Draw lines for the color pattern on the lower part of the front legs and finish with detail to the paws” (Green 23).


Final thoughts: Overall, most of this drawing was easy even though there were some difficult parts such as the mouth and the little details that took a little more time to perfect. Also, the shape of the legs was kind of hard to perfect but I’m pretty happy with the result.

Questions: While preparing for finals, what did you do to relax? Have you done this before or was it a new technique you tried?


Basic Dog Drawing - Dachshund


Drawing this second one was still as relaxing. There was no pressure to be prefect with my drawings and it didn’t take a lot for me to do. This was something that was calming and fun.


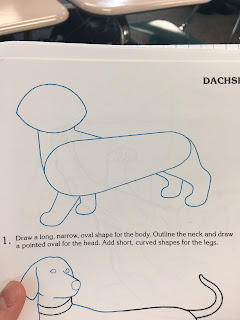
For my second drawing, I stuck with something simpler for the outline so I could try to play around with the details. I hadn’t had many details in my last drawing so this was my opportunity to test it out. Of course, first of all, I had to start with the basic outline first. The book says, “Draw a long, narrow, oval shape for the body. Outline the neck and draw a pointer oval for the head. Add short, curved shapes for the legs” (Green 11). The outline was pretty easy but some of the proportions were a little hard to draw.


Of course from there I had to refine some lines which wasn’t that hard. You didn’t have to make very many changed to it. The instructions for the next steps were, “Refine the head, neck, and jaw. Add in the shape for the collar, Shape the legs and paws, and outline the tail” (Green 11). The hardest part was making sure everything was in proportion. Sadly, I forgot to take a picture of this step as I was drawing.


From there, it was a lot of erasing and making sure the legs were the proper shape. Getting the shape correct wasn’t that easy but after doing one paw, I got it down pretty quick. The instructions were, “Refine the shape of the body by adding curves to the dog’s back, chest, legs, and paws. Refine the shape of the ears and the jaw. Add shapes for the eyes and nose” (Green 11). This step was really simple after drawing the paws on my last post even though the shape was harder to accomplish.


The last step in the book was to add tiny details. The book says, “Detail the area around the eyes, nose, and mouth.” Add contour lines to the ears, neck, chest, and tummy. Draw in lines indicating the color pattern and markings on the dogs fur” (Green 11). I was not able to get the details exactly as I wanted the and that kind of upset me but I was pretty happy at the final look. It wasn’t my best drawing but I can still improve.


Final thoughts: This drawing was more difficult in the last and getting the details right made me a little anxious because I wanted it to look perfect and that was very hard to accomplish.

Questions: If you were to draw this, what details would you add/remove to make the dog look better?
Wednesday, November 30, 2016

Basic Dog Drawing

Drawing is something that people do everyday whether it's doodles or masterpieces, its something that we all do. I've never been advanced in art and I really have the desire to get better even if I am just drawing dogs. Another reason that I wanted to learn to draw is because it is a technique many people use to relax and get their mind off of things. Between cheer, school, and family, I am always stressed so I believe drawing will be very good for me.


The book I decided on is "Dogs Draw and Color" by John Green and the dog I chose to draw this post was a beagle. The first step in the book is "Draw a pear shape for the body and add lines for the neck. Outline the head and ears. Draw elongated oval shapes for the legs with rounded ends, making the front legs slightly longer than the rear. Add a shape for the tail." (Green 1) This shows that the bases of drawing starts with basic shapes. After you create the rough outline you add details.


Final thoughts: This drawing was an easy one but some of the details were harder and getting the proportions on some of the dog were kind of hard.

Questions:
Do you draw for relaxation or for fun? If so, what kinds of things do you like drawing? Do you like to draw things you never have?