Pages

Showing posts with label Perspective. Show all posts
Sunday, January 29, 2017

Nature Photography

Hello again, this is my second post for today, this time on nature photography. I got some good shots I think you guys will enjoy while I was walking on the Soos Creek Trail I mentioned in my last post.

So the first photo I have here is a close up of some moss on a fence post.
Closeup of white-ish moss on a post.
I really liked this picture. Something about the moss up close and the huge difference in depth really makes it look good in my opinion.

This next picture is another closeup of moss but this time it's on the side of a tree.

Moss on the side of a tree I saw.

I think I like this picture for the same reason as the other picture, but also because of the amount of color in the moss, along with the contrast between the grayness of the tree and the yellow-green of the moss. Onto the next picture, this time it's not just a picture of moss I swear.


I thought this picture was pretty good but the I don't like the amount of blur in this. Too bad this was the only tree picture I got. Regardless, I think the contrast of the gray sky and green trees looks pretty alright.

I'll leave this last post with the question of what is your favorite angle to take pictures from: below, on the same level, or from above the subject?


Landscape Photography

Hello friends, I decided to walk on my local trail and take some pictures of the landscape and nature. I was inspired by a comment on one of my previous posts talking about landscape and nature. In this post, I'm going to be talking about landscape.

So before I even got into the park and onto the trail, I saw a good opportunity to get a good landscape shot, as you can see here:
The entrance to Soos Creek Trail.

I felt like this shot was good but I'm unsure if its a great example of landscape. I do like the look of perspective though as you look down the trail. I think this next picture is a better example.
A river down the trail that goes under a bridge.
As I was walking down I saw a river that lead under a bridge and I felt this would be a good subject for landscape. I think this picture was better because you get a wide shot of the whole scene without as many obstructions like in the first picture. This one also has a good perspective on the river. 

After this little adventure, I was feeling a lot better, as I was a bit frustrated at all the homework I had to do. Not only that I also was able to complete all my blogs in one trip which is a pretty good bonus :D. I also realized that landscape and perspective really go hand-in-hand.

On that note, what kind of subjects do you like to take pictures of. This question is a bit similar to my last one, but I'm curious.

Sunday, January 22, 2017

Perspective

Today while I was reading Digital Photography Essentials, I came across a page on perspective and view points. I thought this would be a fun thing to experiment with because I've done depth of field before and as I was experimenting, I noticed how perspective and depth of field really go hand in hand. You can see the results of this experimentation in the following pictures.


You can see with this first picture that perspective can create depth of field, and show distance, i.e. the stones in front being really up close, and the tree in the back far away. If used correctly, perspective can be quite useful in taking a good picture, which you can see an example of no perspective in this next picture. 

This is an example of a bad use of perspective, and you can see the difference it had on the quality of the photo. It’s difficult to judge distance and makes everything seem bland and have no detail. 

This third picture, while not up close and personal, is still an example of perspective. This is because it has the railing in front up close, and the patio and tree in the middle/back, giving a sense of depth.

I’ll end this post today with this: what is your preferred perspective: up close, far away, or maybe something else?


Sunday, January 24, 2016

Drawing Toy Airplanes

Drawing shapes had been fun but it is a bit bland to continuously draw. My lack of experience prevents me from drawing something as complex as a car. I have tried a few times but it had some embarrassing outcomes. So I decided to draw something simpler again: a toy airplane. I used one of the book's sketches as an example and started the project. When you start to draw something in perspective, "loose sketches [helps you] focus more on what you are drawing than on how you are drawing it" (Robertson, and Bertling 132). Loose sketches are basic sketches and models of what you are going to draw. It helps you visualize how you are going set up your lines and drawing. I started my drawing with an ellipse in the front for the nose of the plane. I created a grid and a vertical plane to draw the body.


I sketched out the body and set up a horizontal plane to add the wings. To add the wings, I first drew two-dimensional wings on the horizontal plane and used vertical lines to move the wings to the body.


I used a blank sheet of paper to sketch the plane and shade it in. Drawing aircraft is very useful in practicing the basic techniques because every form can be displayed through X-Z-Y section lines (Robertson, and Berling 123). Starting off with simple airplanes can help you get into more advanced designs that can eventually come straight from your imagination. 

What are some techniques that help you improve drawing objects?

Robertson, Scott, and Thomas Bertling. How to Draw: Drawing and Sketching Objects and Environments from Your Imagination. CA: Design Studio, 2013. Print.
Monday, January 11, 2016

Drawing 3-dimensional shapes

For the past few posts, I have been using simple rectangular shapes to create drawings and structures. As I continued to draw structures, I started to learn techniques in drawing curved objects with round corners. I soon also learned how time consuming drawing 3-dimensional shapes were. To show a simple example of drawing a complex 3-dimensional shape, I started off with a rectangular prism. Scott Robertson and Thomas Bertling states that "a useful way to think about these types of section drawing is that they are 'working drawings' and can endlessly massaged and modified into new forms" (88). Using the rectangular prism as a base, I used ellipses to create round corners for the prism. I divided the inside of the prism to create a hollow shape by creating another prism inside the original prism.


I used the outline to clean up drawing by taking a clean sheet of paper and sketching over the outline. I added some minor shading to give the sketch some dimension. Taking the time to review and practice the basics is necessary to be able to master drawing complex volumes (Robertson, and Bertling 81). It has been said many times throughout the book about the importance of practicing techniques and drawing exercises. I have learned many new techniques but if I wanted to be as good as the authors of the book, I would need to practice many for many years.

Is it more important to draw accurately and if it is, would you take the time to practice drawing accurately? 


Robertson, Scott, and Thomas Bertling. How to Draw: Drawing and Sketching Objects and Environments from Your Imagination. CA: Design Studio, 2013. Print.

Thursday, December 31, 2015

Drawing Simple Structures

Drawing environments is not something that you can learn overnight. Drawing even simple structures take much effort. I came to learn that there are many steps to drawing structures. Something that may be as simple as a square building has many different techniques to draw them. To draw an environment it is best to start with a general idea of the finished product (Robertson, and Bertling 108). Scott Robertson and Thomas Bertling states that "A great way to create a perspective grid quickly is by using a photo as an underlay." (108). For practice I started out with a simple picture of a simple square house that was clean with not much detail to it. First I found the vanishing point of the house by intersecting two guide lines at the house. From there, I could use the point to create a rough one point perspective outline of the building. I used black ink to outline the visible edges of the drawing.


To finish the drawing, I took a new sheet of paper and used the it to make a sketch of the house and added details. The details were mostly basic boxes that would defines the windows, doors and small accessories on the house. Even though my house is still quite simple in the end, the extra details I added made the house look more house-like than the underlay I used to create it. The finished product would look less appealing without the windows and doors. According to Robertson and Bertling, "Detailing a drawing is an important step to making it more successful, and being able to do that happens when you spend time improving your visual library." (107). The best way to be able to get better in drawing structures and environments would be to practice continuously.

What kind of details do you think the author means by improving your visual library?

Robertson, Scott, and Thomas Bertling. How to Draw: Drawing and Sketching Objects and Environments from Your Imagination. CA: Design Studio, 2013. Print.
Sunday, November 29, 2015

Perspective Drawing Techniques

For the past few years, I have drawn mostly humans trying to get the face alignment and body proportions right. I haven't thought much in drawing inanimate objects and large scale backgrounds. As I look through the book How to Draw by Scott Robertson with Thomas Bertling, I can see the many different skills one needs to understand to draw an inanimate object. Perspective is an illusion and drawing it is just an approximation of how we see the world (Robertson, and Bertling 21). Many of the techniques that Robertson includes has given me a new look on how to draw an object in perspective and formally. This style of drawing makes erasing a disadvantage since it may erase intersecting construction lines that may be needed to explain your drawing (Robertson, and Bertling 13).

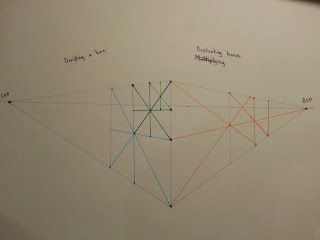
Dividing and duplicating boxes in perspective.
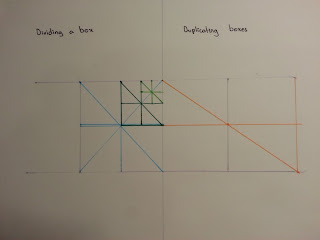
Dividing and duplicating boxes in two-dimensional space
One of the first things you learn in the book are the different techniques used to draw in perspective. Some of the techniques include using vanishing points, dividing / multiplying boxes, and duplicating boxes in perspective. According to Robertson and Bertling, "Being able to divide and multiply dimensions in perspective is one of the key building tools used to generate drawings."(30).


Using these techniques to divide and measure distance, I created a simple stair case with no details in 2 point perspective. I first set up 2 points to use as vanishing points on opposite sides of the paper. Then I created a simple Grid by equally spacing out spaces on the main line (highlighted in red) to create equal steps to the stair case. Using the diaganol line (highlighted in green) I created steps and connected the points together. I used blue pen to show the main staircase so it will stand out from the other lines on the paper.

Do you think there is a simpler way to draw a staircase or are these techniques easy to use?

Robertson, Scott, and Thomas Bertling. How to Draw: Drawing and Sketching Objects and Environments from Your Imagination. CA: Design Studio, 2013. Print.