Pages

Showing posts with label Makeup. Show all posts
Sunday, January 28, 2018

A Guide To Getting a Glamorous Makeup Look: Eyes

Hey Guys! For this blog I'm going to be talking about the eyes in this makeup look. The eyes are usually the center focus for the makeup look. When starting your eye look, there are many this you need to take into consideration. According do Gary Cockerill, a professional makeup artist, "Skin tone, hair, and eye color should all be taken into account when you're choosing a color for your eyes"(Cockerill 119). Not only do you have to know your skin type for foundation, but its important to know it for the eye makeup. For different eye colors, come different shades to correspond with that color. For example, if you have blue eyes, the best shades to go with that would peaches, purples, golds, and pink tones. If you have really fair skin, the best shades to go with that are taupe's, browns, golds, and soft tones. However, that's not all. For hair color, blondes usually go with golds, pinks, and grays. While brunettes work well with browns, greens, and purples. Getting the look you want with eye shadow takes time and practice. Eye looks can vary from very neutral to a intense smokey eye. Cockerill says, "From a sheer colorwash or a natural and nude eye for daytime or to compliment a strong lip, to a glamorous contoured eye or a statement flick, there are almost endless ways to make up the eyes"(Cockerill 162). For a neutral look, you want to use soft tones and matte shades. However, for a smokey eye, you want to use dark, sometimes shimmery shades. There are many different palettes that are good for different eye looks. Here are a few that I like to use.


Now that you have read this blog and all the tips I have left for you, what will be your next eye look? A calm neutral look, or an intense smokey eye?


Cockerill, Gary, et al. Simply Glamorous: Make-up Transformations to Make You Look & Feel Fabolous. Jacqui Small, 2015.

Thursday, January 25, 2018

Lipstick application

As I was reading the Bobbi Brown makeup manual, I came across Chapter 5 which is all about application of lipstick and choosing the correct shade. I rarely wear lipstick with a complete makeup look, maybe just a dab of lip gloss or Carmex. But while reading I realized the importance of lipstick, especially in the beauty industry. It's not often that you see celebrities going out in public with a full face of makeup, but no lip color. This inspired me to go more into depth with lipstick.
Brown includes a chart that shows which lipstick shades would look best with which natural lip colors. She states that for lips similar to mine, brown, rose, pink, orange, or warm red shades would compliment those who have a natural medium tint to their lips (80).
I also wanted to learn all about the different formulas of lip products. "Lip glosses provide hydration, sun protection, and sheen... Tints protect lips with moisturizing formulas that usually contain sunscreen... Matte shades are dense and last longest. They contain less moisture than other products, so they adhere to lips and don't fade quickly..." (82).
As I read through the different lip products, I came to the conclusion that matte lipsticks or glosses were my favorite, and could both work on me, since I have neither dry nor very hydrated lips, so typically any product could work for me.
I decided to look through my lipstick collection, and came across 2 products: a M.A.C. matte lipstick, and an Anastasia Beverly Hills gloss.

After I did a full face of makeup, I followed Brown's 5-steps about how to apply lipsticks correctly.
I began at the corners of my mouth with each product, then I slowly applied it more into the middle, and finally I added another layer just so the product would be more pigmented. I did separately this for each of the lipsticks.

(1st set of pictures was with the matte M.A.C. lipstick, 2nd set was with the Anastasia Beverly Hills gloss).
After this, I found that I actually love lipsticks, since they add so much to the makeup.
I wore each lipstick for about 40 minutes, and the matte one did tend to stay on more then the gloss, but that's expected, considering it is more dry. The gloss did fade but it still lasted.
Now I  also know which colors work best for my lips, and not to mention that there are many cheaper dupes for almost every lipstick in the makeup industry! Also, I know now how to apply lipstick correctly so that it looks best.

A question I have for you guys is do you guys prefer lip-glosses or matte lipsticks?

Brown, Bobbi, et al. Bobbi Brown Makeup Manual: for Everyone from Beginner to Pro. Springboard Press, 2011.

Wednesday, January 24, 2018

The importance of eye makeup

A bold eye look is a nice touch to a complete makeup look. I have dark brown eyes, so I love doing bold eye shadow looks with bright colors. As I read the Bobbi Brown Makeup Manual, she states that deep-set eyes need to be brought out with light and medium shades of shadow (96). I have found this to be true, since doing smokey eyes on my brown eyes does looks good, but it's more for important situations, like homecoming, etc.
In Chapter 6 of the Makeup Manual, Brown has a page with 5 steps to reaching an even eye shadow look with bright colors. I chose to use my Take Me Back to Brazil palette because it has a wide variety of colors.

The first step is to chose a shade that I like. I decided to start with a pink shade because pink suits my eyes best.
The second step states, "Cover the entire lid three-quarters of the way to the brow bone, blending as you go" (Brown 97). I followed this step with my best effort, but this was a bit out of the ordinary for me because usually when I am doing bright eye shadow looks, I do either a cut crease or a halo eye. But for the sake of this, I wanted to learn how to do a simple eye shadow look and still use bright shades.


Third, is to layer the bold color so that it is more pigmented and blend in any other colors into the crease.
Fourth is to just blend the color out more so that the line isn't so harsh.


Fifth is to add any other colors wanted to reach the desired look.


After completing the eye shadow, the outcome was a bright pink blend with orange and purple hues added just for more of a pop. Using Brown's steps made me achieve this easily since I had guidelines to follow. If you struggle with eye shadow, this blog could provide you with tips and tricks on how to reach a bright eye shadow look.
A question for you guys is do you guys prefer bright eye shadow or more neutral shadows?

Brown, Bobbi, et al. Bobbi Brown Makeup Manual: for Everyone from Beginner to Pro. Springboard Press, 2011.

Tuesday, January 23, 2018

Tips for a smooth and glowing complexion

To have flawless foundation application, having smooth and glowing skin is essential. To reach that, understanding how lifestyle can affect the skin is important. I am someone who struggles with combination skin - this can be considered an advantage, considering most foundations or face products work on my skin type. But when having oily and dry skin, finding a face wash, moisturizer, and more, can be a struggle.
Bobbi Brown, a professional make artist and the founder of Bobbi Brown Cosmetics, states in her book that the condition of your skin can be impacted or changed due to many factor: the environment, diet, or overall health (33). This means that there are many things that can contribute to the type of skin someone may have, for example, skin that is red and dry can be caused by very hot or cold temperatures. For me, I have found that very cold temperatures lead my skin to be more flaky than usual. In the winter, the cold weather dries out my skin and minimizes my pores, which impacts my makeup application and often causes me to have to use a different, more hydrating foundation.

Brown goes into further description and analysis about all skin types, "Normal skin: comfortable feeling, smooth texture with small pores... Dry/Extra Dry skin: feels tight after washing, pores are small and sensitive... Oily skin: large visible pores, frequent breakouts... Combination skin: oily T-zone, dry cheeks or spot dehydration" (32). Before reading this chapter of the book, I did not know how to identify certain skin types. Brown led me to the conclusion of me having combination skin. I did some research on what products work best on combination skin, and I found that the brand Murad has a set of face washes and moisturizers for skin like mine.
This face was is a gel based cleanser, which Brown states is best for oily or combination skin that are prone to breakouts (34). Ever since following Brown's tip on using a gel cleanser, my skin has cleared up and my pores have been minimized, which leads to less breakouts.

A question I have for you guys is: what type of skin do you guys have? And what cleanser or facial products work for your skin type?

Brown, Bobbi, et al. Bobbi Brown Makeup Manual: for Everyone from Beginner to Pro. Springboard Press, 2011.
Sunday, December 31, 2017

A Guide to Getting a Glamorous Makeup Look: Foundation/Face

Hey guys, welcome back to my blog. in this blog i am going to be talking about the next step in getting the makeup look you want. The first step for your look is the foundation. You need to find your perfect color for your skin type. There are many different colors of foundation for different skin colors. When you have the right color, it makes the whole makeup look all put together. It also helps when you have the right brand of foundation. different brands can have different affects on your skin. it might make you makeup look oily, or it might not blend well with your skin. "Choose one that is suitable for your skin type, matches your skim color, and gives you the amount of coverage you require" (Cockerill, 32). You can apply foundation with a brush or a beauty blender, either works just as good. After foundation, there is concealer and powder. Both of these products help conceal and finish off the face. "With the many colors and consistencies of concealer available, you can usually hide anything from a simple blemish to dark under-eye circles, scarring, birthmarks, and even tattoos" (Cockerill, 31). Concealer and powder will help make the face look really smooth and clean. I hope this blog helps you start your makeup look and keep looking for my other blogs to help with the rest of your look. Thanks for reading!

Cockerill, Gary, et al. Simply Glamorous: Make-up Transformations to Make You Look & Feel Fabolous. Jacqui Small, 2015.


How to: Makeup Manual / Face

The most important aspect to a complete makeup look is the foundation. Judging just from its name, we can gather that finding a good way to keep an even complexion is one of the first steps to having a good makeup routine. As someone with combination skin (both oily or dry skin depending on time of year), I have yet to find a foundation that sticks all day, doesn't get oily, and gives an airbrushed finished look, all while not damaging my skin during its time of application. Since I have not found a foundation that does all that and evens out my skin tone, I decided to turn to concealing and color- correcting in order to achieve my goal. 
In chapter 4 of Bobbi Brown's Makeup Manual, she provides several different techniques and tips on having good skin coverage for your specific tone/type of skin.
The main aspects I wanted to focus on in the skin makeup category is brightening my under eye area.

"Correctors can be pink or peach toned. Make sure it is applied up to the lashes and in the inner corner space between the eye and the bridge of the nose." (Brown 54). Brown elaborates how to use color corrector the right way.

Before reading this chapter, I was already familiar with color correctors, but not each of their specific jobs. I found through reading this section of the Makeup Manual that peach or pink toned concealers are specifically made for the under eyes, since it cancels out the purple/green/blue tones that under-eye bags typically have. 
I rummaged through my makeup bag and found a NYX under eye color corrector and decided to test it, following Brown's 4 steps to achieving brightened under-eyes.

I started by applying the corrector up to my lash line in order for all the darkness or discoloring to be completely gone. Then I went over the color corrector with my usual Tarte concealer, blended it with a beauty blender, and set tat with setting powder. I used the same routine for the other eye, only without using color corrector,

As seen in the results below, the side with color corrector is much brighter than the side without it, and the color corrector cancelled out the blue and purple tones in my under eyes.


⇡⇡⇡⇡
My left eye: side with only concealer
My right eye: side with color corrector and concealer

Through this chapter, I learned how to properly conceal under-eye darkness using tones that cancel each other out, instead of just applying concealer straight onto my under eyes. Truthfully, I thought this tip would be just like any other hack and not make any true impact, but I was surprised with the outcome and I will certainly be adding this to my foundation routine. A question for those reading is have you guys ever used color corrector? And if so did it work?


B Brown, Bobbi, et al. Bobbi Brown Makeup Manual: for Everyone from Beginner to Pro. Springboard Press, 2011.
Wednesday, November 29, 2017

How to: Makeup Manual / Defining brows

Enhancing and shaping brows has been a trendsetter in 2017. Getting natural, dark, shaped brows has never been easy, so I decided to follow an experts steps: Bobbi Brown, a professional and well-known makeup artist.
Before I read this book, I struggled with my brow routine, and set out with a mission to finding a fool-proof method to having Instagram-worthy eyebrows.
This chapter I am reviewing focuses on shaping and defining brows, Brown includes instructions on filling in brows for different situations. Which in my case, is having nonexistent brows. "Use a pencil the color of original brows, and softly draw in the shape." (Brown 90).
In order to reach my perfect brow using Brown's steps, I followed her instructions, with my Anastasia Beverly Hills eyebrow pencil in the shade "dark brown".

"The start of the brow should follow an imaginary line drawn from the outside of the nose to the inside corner of the eye." (Brown 90).
I used this as a template and kept my eyebrow color at the outside of my nose, reaching the corner of my eye.

Brown also includes many images of the 5 steps to shaping brows, along with small paragraphs beside the picture explaining what to do. As I get further and further into my brow, I reach the arch, and switch my gentle shading technique to pressing the pencil down harder to solidify and darken the color of the brow. Following step 4, I bring the pencil to the center of my brow to create an arch, and then turn the pencil to go down.

Once I finished my brow using Brown's instructions, my eyebrow's looked much more natural. These steps and picture examples that Brown included in her book helped me understand how to outline the natural brow shape, and how to fill in/shape brows without it looking like you filled in your eyebrows completely. Instead of just applying product to one area of my brow and blending it out as I did before, I use a pencil a few shades darker than my brows, and create a color gradient until the arch of my brow, where the color begins to darken.


This was the final product. Trying these procedures the first time through was a minor struggle, nothing a little makeup remover couldn't fix. But the more I practiced the simpler the steps got. Thanks to these steps, my brow routine is no longer a worry for me, and I can flaunt my naturally defined eyebrows.


A question I propose to those reading this, is what has worked better for you guys, eyebrows gels, powders, or pencils? And why?
Thanks for reading and engaging.

Brown, Bobbi, et al. Bobbi Brown Makeup Manual: for Everyone from Beginner to Pro. Springboard Press, 2011.


Monday, November 27, 2017

Importance of Skin Preparation


Beauty Routine: Importance of Skin Preparation

Why would skincare involve makeup? Beauty starts with smooth, healthy, glowing skin. Many people tend to forget about skin care beforehand and place makeup on directly, resulting in damaged, clogged pores. Preparing your skin before the application of  makeup will ensure you flawless results, as well as increase the longevity of your makeup. Based on the individual products may vary whether you have normal, combination, sensitive, dry, or oily skin type. Include a cleanser, exfoliator, toner, moisturizer, as well as SPF to your daily routine as it creates a barrier between your skin and the harmful UV rays given off from the sun.

Personally, through all four seasons I have very dry skin. Without properly hydrating beforehand, my foundation looks like the Sahara desert. My skin will often flake, and when your base is not cute, you're not cute. Especially in person. But neither is looking like an oil spill appealing. People tend to always complain that, "oh I don't have time". But sad truth is that, we can't all be blessed with normal skin, and have to work for it in the long term

Analyzing your skin will help you recognize your own particular routine that is beneficial for you. So you can go slay all day. But here is some information for educational purposes. Normal skin is ideal as it is neither too dry nor too oily. People with combination skin tend to have an oily t-zone, while having the cruel experience of dry cheeks, or spot dehydration at the same time. Us dry skin people can be flaky, and tend to have a dull complexion. Oily skin is shiny throughout your entire face as it is caused by overactive oil-producing glands. But on the positive note, you'll have beautiful youthful skin longer than me. I'm also very sensitive, and sensitive skin is more complex because it ranges from dry to oily skin, and is easily irritated by many cosmetics  and skincare products.

According to Bobbi Brown, an internationally renowned makeup artist, and CCO of Bobbi Brown Cosmetics, “The skin’s condition can be quickly impacted by changes in the environment, health, diet, and even products chosen in which irritate the skin” (Brown 33).

Cleansing, and toning will tighten pores, and remove excess oil, promoting longevity of the products. Exfoliators will improve skin texture by removing dead skin cells, as well as decreasing the appearance of hyperpigmentation on skin’s surface.

But, hydration is the most significant step of skin preparation as our skin’s tone and flexibility relies on the water content of our tissues drawn from the humidity of the air, as well as moisture added onto the skin’s surface. Adding moisture will help maintain luminosity, and firmness. It's truly the secret to having youthful skin. Products entitled as a moisturizer will plump your skin. Enhance the look, feel, and overall health of your skin. No one likes wrinkles, and big pores am I right? Hence, the right moisturizer will help your makeup application to go on smoothly, and properly adhere to your precious skin.

I tend to go towards products in which don't tighten my skin and tend to be quite hydrating, so it may not appeal to oilier skin. But please, no matter what skin type you have, avoid alcohol. It'll only irritate, and dry out your face significantly causing your pores to create even more oil.

While I could continue to rant about the different types of skin, and the significance of preparing your face before applying makeup, there are 6 tips in which are beneficial, and adhere to all skin types. Use a broad spectrum sunscreen that blocks UV rays, and avoid long periods of direct sunlight. Too much sunlight can cause aging process to quicken. Stay hydrated by drinking water, as well as moisturize. Not only will it help the condition of your skin, but bodily functions as well. Obtain a moisturizer that works for you. For oilier skin types, I recommend using gel bases rather than creams. Do not ever smoke, nor try any form of narcotics. Most importantly, wash your skin gently everyday, and never wear any form of makeup to bed. Will you incorporate skin care to your lifestyle?
Saturday, January 28, 2017
For my very last blog post I decided to do a more natural type of makeup you could easily wear to school or work. I had to dig deep into my book for this makeup look to find the tricks to a more natural type of makeup. First thing first, eyebrows. “The eyebrow should look well-groomed and defined and be of color slightly darker than the hair” (Corson 255). At this point in time my hair was dyed to a mixture of blonde streaks and dark brown streaks so I decided to have my eyebrows match the dark brown section of my hair. The book said the eyebrows should be well groomed so I used pomade because it worked the best for making the eyebrows crisp and well-shaped. 
My next step was adding a small about of blush. “Choose colors that complement the lips and provide a matte finish” (Corson 254). I chose a pinkish brown lip color so I decided it would be best to do a very subtle pink blush. I blended it on the apples of my cheeks where faces are naturally more flushed. 
My last piece of research was what color eyeliner I should use. When you go to the store there are many colors of eyeliner so I was curious which I should be purchasing. “Those with medium to dark brown hair should use dark brown, or charcoal eyeliner” (Corson 256). Since for this look I wanted elongated winged liner I decided to go with a charcoal colored eyeliner so my eyes would be the center point of this look. In the end I applied a cut crease to my eyes, some foundation, and other products to finish up the look. The final product turned out nice and would work great for a day at school where you want to feel dressed up.  


What type of makeup do you find yourself applying most?

Corson, Richard, et. al.. Stage Makeup. Englewood Cliffs, NJ: Prentice-Hall, 1975. Print.
For my next blog post I decided to recreate a type skeleton like makeup. I wasn’t sure where to start so I decided to look into my Stage Makeup book. When I was looking through the book it had some great advice on how to create a skeleton type look; “[A skeleton] usually has a long face with sharp, pointed features…” (Corson 274). I took this advice when applying my face paint by using crisp lines and blending only very small parts of the face, keeping most parts as straight lines so the features would be very sharp. 
While I knew how to draw my skeleton I was still unaware of what colors I should be using. “Most conventional skeletons are black and white with gray sections of shadowing” (Corson 273). I decided to make my skeleton look very conventional and follow the exact colors that the book recommended. I used whites on the parts of my face I wanted to be highlighted and blacks where I wanted my face to look deep and in small sections I applied grey to blend the two together. The final look turned out pretty good and would work great for Halloween!

If you were to recreate this look what would you have done differently?

 Corson, Richard, et. al.. Stage Makeup. Englewood Cliffs, NJ: Prentice-Hall, 1975. Print.
In stage makeup it is essential to know how to apply fake cuts; so for this post I decided to apply my makeup as if I got into a big accident. I looked in my book to find some tips and tricks to make my makeup realistic. “Deeper cuts usually require building up the area with wax or putty” (Corson 149). Sadly, I did not have wax or putty available but I built up some of my cuts using liquid latex which works similarly to cosmetic wax. After building up layers upon layers of liquid latex I use scissors to create a deep incision to where I built up the fake skin; but you can’t just leave it at that because everyone knows that cuts get irritated and usually end up bleeding. 
“The inside of the cut can be painted red with greasepaint. For a cut that is still bleeding, a few drops or even a stream of artificial blood can be added to the cut…” (Corson 149). I decided to make it as if my nose and my cuts were still bleeding to I used my Bill Nye Scab Blood product and applied it to the inside of my cuts and running in a stream out of my nose. All in all I think the finished product looks pretty realistic and could easily be used in school plays or for Halloween.

Have you ever attempted to apply fake blood?

Corson, Richard, et. al.. Stage Makeup. Englewood Cliffs, NJ: Prentice-Hall, 1975. Print.
Photo shoot makeup is something I am completely new to. Using face paints and other odd makeup products was something new and out of the ordinary to me; so when my friend Rachel asked me to do makeup for a few people for her photo shoot I was beyond excited to tackle the challenge and learn to use a few of this challenging products. When looking for facts, tips, and tricks I looked into my Stage Makeup book written by Richard Corson, Beverly Gore Norcross, and James Glavan. "[Body paints] can be mixed with water or setting liquids to produce a smudge-proof, water-proof surface that can easily be removed with soap and water" (48). I tried this trick by mixing the paints with water and it worked great! My makeup lasted all photo shoot without budging at all; but body paint wasn't the only thing I had to place on my face. Personally my face is spotted with blemishes that I didn't want to be shown during the photo shoot so I decided that concealer would be necessary. I previously knew how to apply concealer but I wanted to know if the Stage Makeup book had any secret tips or tricks for me to follow to better improve my makeup. Sure enough it did; "Moist or creme colors can be blended into the concealer, then powdered in order to set the makeup and remove the shine" (Corson 55). I tried this trick because I didn't want the shine of the concealer to be even brighter paired with the flash of the camera. Luckily the trick of setting the concealer with powder reduces the shine immensely and I was so glad I tried it! Here was my finished look:


Do you use powder to set your concealer? Corson, Ricard, etc. al..Stage Makeup. Englewood Cliffs, NJ: Prentice-Hall, 1975. Print.
Saturday, December 31, 2016

Eyeshadow

Everyone has a hobby. my hobby is that I like to do my makeup. If you think about it, doing your makeup  is like creating art on a canvas. sometimes I would like to consider that my face is like a canvas. I would pretend that my foundation and powder were the  base of my canvas and the colors that I would add to my cheeks and eyes are the real art that I was creating.

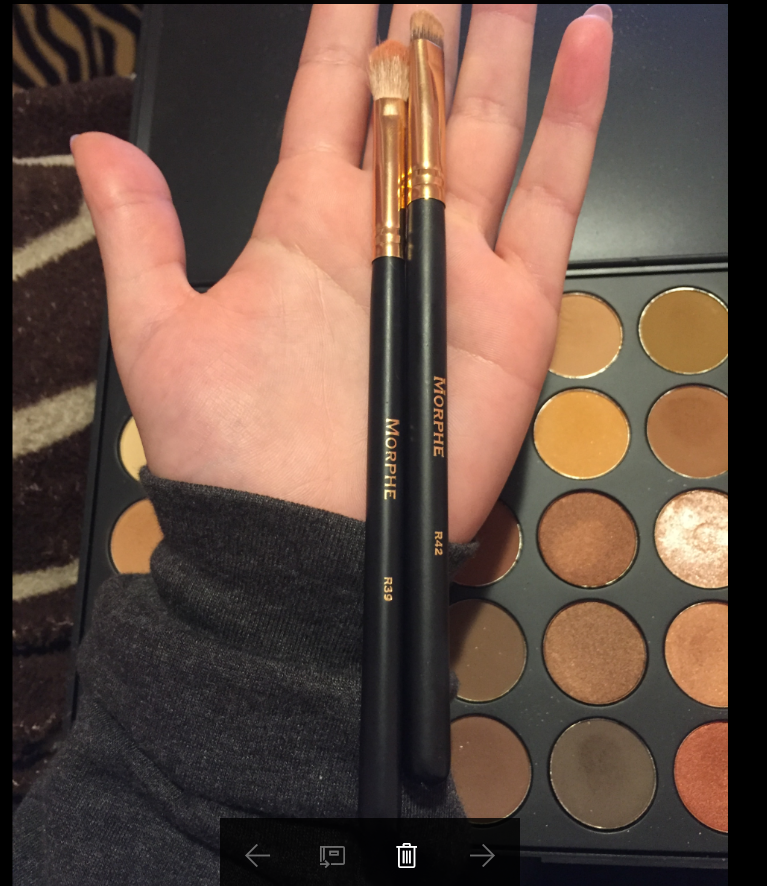
For the look I was going for I started to gather all of my materials that I needed to create the  look that I was going for. In the book Face paint the story of makeup by Lisa Eldridge it states that " Max Factor introduced his color Harmony principle in 1918, stating that blondes, brunettes, brownettes, and redheads all required different colors to look best." (Eldridge 130).  So, while gathering my materials that I needed which included the Morphe 350 pallet, Morphe brushes R42 and R39 and a primer,while doing so,  I looked over the pallet to choose colors that would best suit my brown eyes.

First I started off by priming my eyelids and getting a pale peach color and adding it the the crease of my eyelids  and blending it out while making sure that I blend it in a motion that includes the Eyeshadow to go above my crease. Next, I took an orange colored Eyeshadow and added that on top of the original Eyeshadow and I made sure to blend it so it does not have any harsh lines. Then. I added a white Eyeshadow to the middle lid and inner lid. I made sure to pat it on with the R42 brush and then later blend it with the R39 brush so it all looks blended and the colors corresponds with each other. Lastly I added a sparkly Eyeshadow the the inner eye and the just below my brow bone.

we all do our makeup differently so my question to you guys is...
what do you do differently then me?
do you like to do natural looks or more dramatic?
what types of colors do you use that you found best suites your eye color?


Wednesday, November 30, 2016

My Journey With Stage Makeup.
               It all started when I was a little kid playing with my grandma’s makeup. My grandmother has always been in stage productions, so from a young age I have been interested in the art of makeup. There are many important things to remember when applying stage makeup.


               For this particular attempt at stage makeup I decided to apply it as if I were an elf. According to Corson, elf makeup includes short or very long hair, and colored looking cheeks (275). It was also suggested that you should make sure that when you apply heavily pigmented colors you spend time blending them out properly.  Personally I chose to center my makeup around a purple color because I have a connotation of purple being magical, but with choosing a brightly colored and heavily pigmented color came the chore of blending for what felt like hours!


               Another way to enhance the look is to add ears that are much different than human ears. “Elves are usually pictured as very small with pointed or butterfly shaped ears” (Corson 275). Within my practicing of stage makeup, I’ll be able to take was Corson said and apply it to the looks of other creatures. Following the tips and tricks written within this book  have really improved the overall appearance of my stage makeup. Adding Corson’s idea of pointed ears with his suggestion of colored cheeks made the face look much more elf like. I was very pleased with the final result.


(This picture was  taken at the halfway point of my elf makeup session.)


What other facial structure ideas or color schemes do you think would enhance the final look?


Corson, Richard, et. al.. Stage Makeup. Englewood Cliffs, NJ: Prentice-Hall, 1975. Print.