Pages

Thursday, November 30, 2017

The Principles of Pool and Billiards

Pool is a game in which the main objective is to strike spheres on a table, and knock them into holes. It is a game that requires skill and coordination; it is also a social activity, and many people around the world have been playing this game for centuries.
In the book The Illustrated Principles of Pool and Billiards by David G. Alciatore, the author explains the basic concepts and techniques of pool with pictures and diagrams.

One of the most important things in billiards is the cue stick. The cue stick is used to strike the cue ball, which is then ricocheted off of other balls."To shoot consistently and make good contact with the cue ball, the cue stick must be straight and the cue tip must be in good condition. Depending on the condition of the cue stick, the outcome of the game can change drastically.


This is a shaping tool, which is used to maintain the shape of the cue tip.

It is used by gently making a circling motion with the tool on the tip.

"The most important thing about the cue stick is the cue-tip condition... If the tip is not shaped, textured, and chalked properly, the likelihood of miscues increases. A miscue is where the tip loses firm contact with the cue ball during impact." (Alciatore 16). Other important things include things such as posture and position, but I will explain these things in the future.

The author also stresses the importance of actually being able to make contact with the cue ball. If you are not able to hit the cue ball with your stick routinely, you will not have much success in playing billiards (Alciatore 15).

So far, the book has helped me understand the fundamental skills needed to play the game of pool. It has also taught me that the game is not only competitive, but is also a social activity.
How could you apply the coordination and social skills used in pool in your life?

Alciatore, David G. The Illustrated Principles of Pool and Billiards. New York, Sterling Pub., 2004.

How to play Hawaiian 'Ukulele (Picking and strumming)

The ukulele originally derived from the instrument guitar to mandolin than finally was known at the ukulele in the Sandwich Islands (Hawaii) ."Its pleasing sounds,its portability, and its relativity low cost qualifies it as an "instrument of the people," offering a way for many to express themselves musically, both singly and in group"(Burton x). I plan to use this instrument and this book to learn how to better use and apply knowledge to the ukulele.

Picking and strumming:

"The best area of the strings for picking is between the sound hole and the end of the finger board"(Burton xiv). i found that when picking the stings over the fingerboard it produces a softer, mellow sound but when i started to pick strings near the hole it produces a twangy like sound to it.I found that its best to pick with your index and thumb for beginners.


Tips and Tools That You Will Need for Baking


Tips and Tools That You Will Need for Baking


To many people baking seems like an easy task, but in reality, baking is all about math, measurements, and preciseness. When I started baking in 6th grade I had no idea to use certain equipment’s for baking. This is a very common mistake that people make when baking. By doing this, your finished product will certainly not taste right or will not look like what it should look like. Today I am here to inform you about tips and the purpose and the importance of tools in baking.


In the picture on the left; spatulas, whisks, scoops, sift, baking paper and cupcake liners are included. These are some of the basic tools that you will need for baking. They are designed for the baking process and each have their own use. First of all, whisks help to blend the batter and incorporate air into the mixture, as air is an important factor for baking. The rounded wires helps to smooth out the batter and the hollow in between allows air to be mixed with the batter. A spatula is also a handy tool when it comes to baking. It helps us fold in ingredients without easily breaking the air bubbles that was created during the whisking process. The silicon texture grabs anything from the bottom of the bowl and help incorporate the ingredients evenly. Next the scoop was for scooping/measuring out a good proportion and serving size of the batter or dough. Lastly a sift, it’s main goal is to strain your dry ingredients or liquid that may have large chunks in it. As the authors said “you should have a fine strainer for baking and straining stocks and sauces,” (Paul, Eric 14). This will improve the quality of your finished product.


Text Box: TIPS: Fold your parchment paper in fourths and place on ¼ of the pan. According to the picture, cut outline of the outer circle and you will have the perfect shape to line your baking pan.

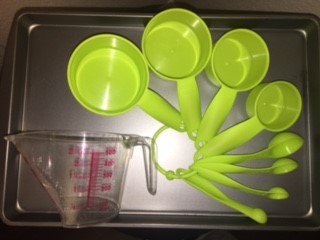
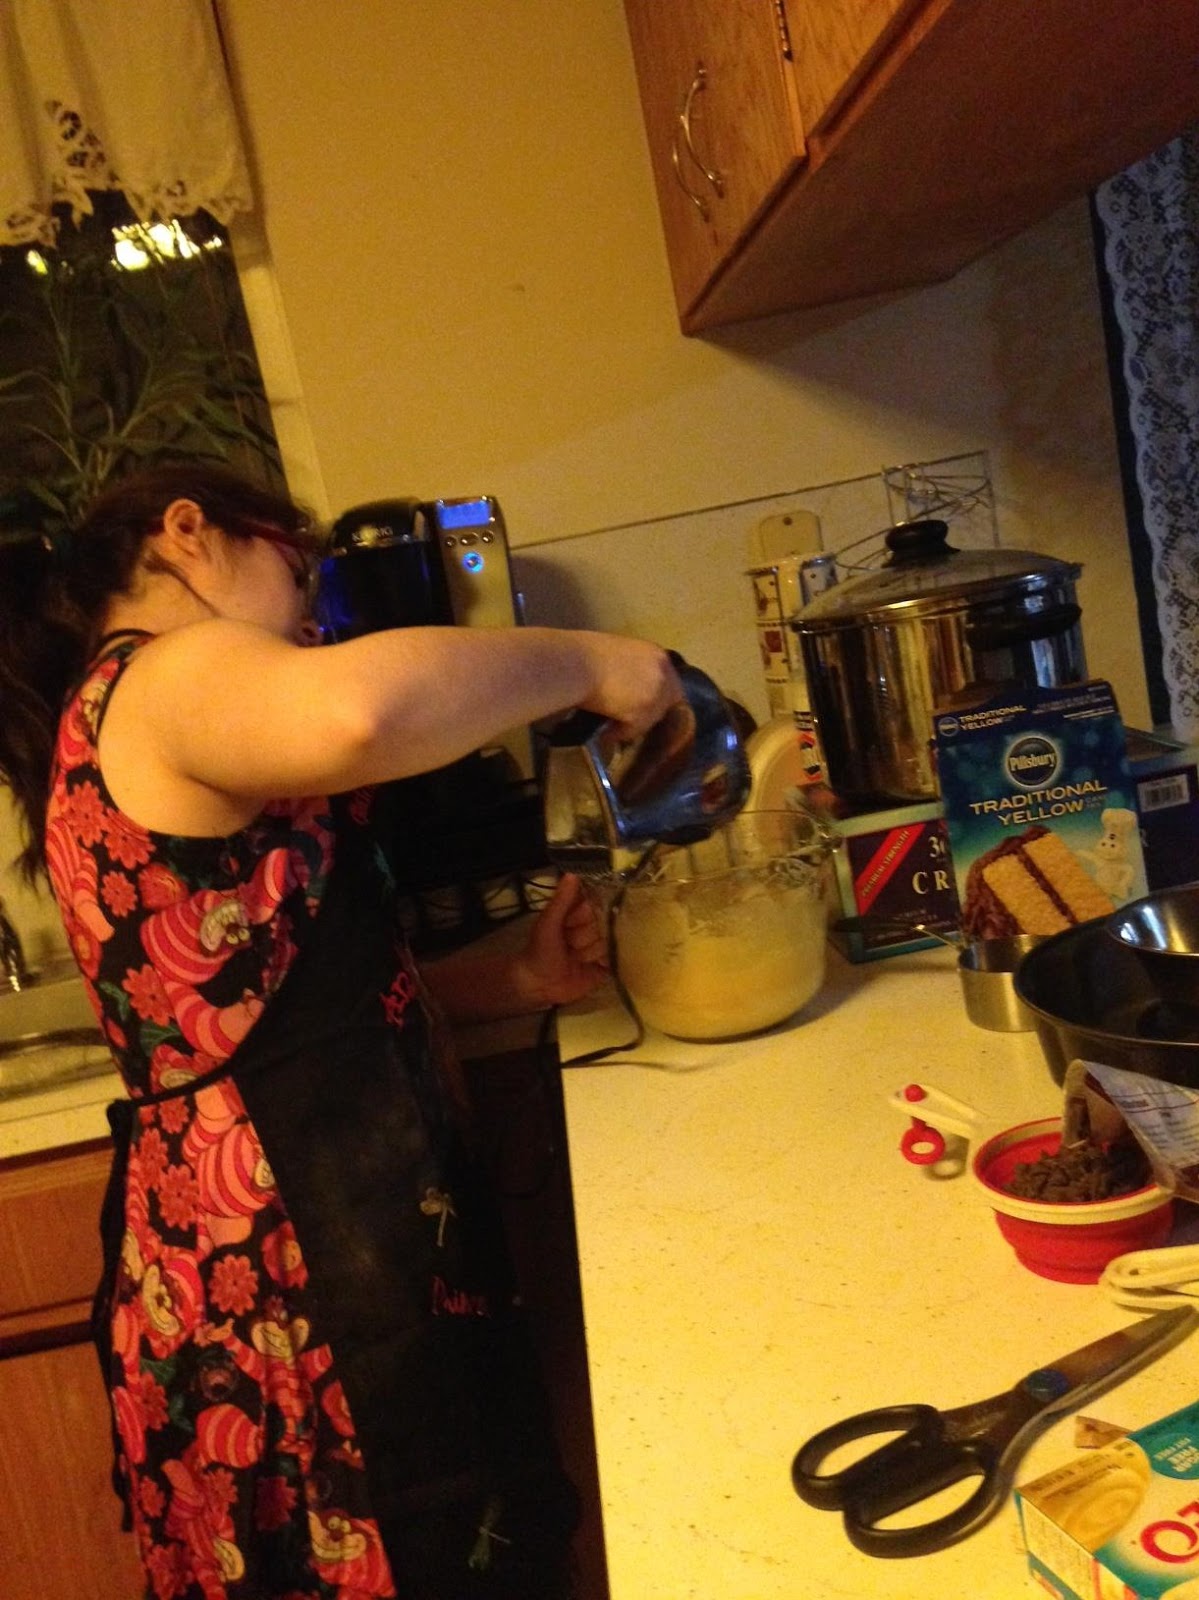
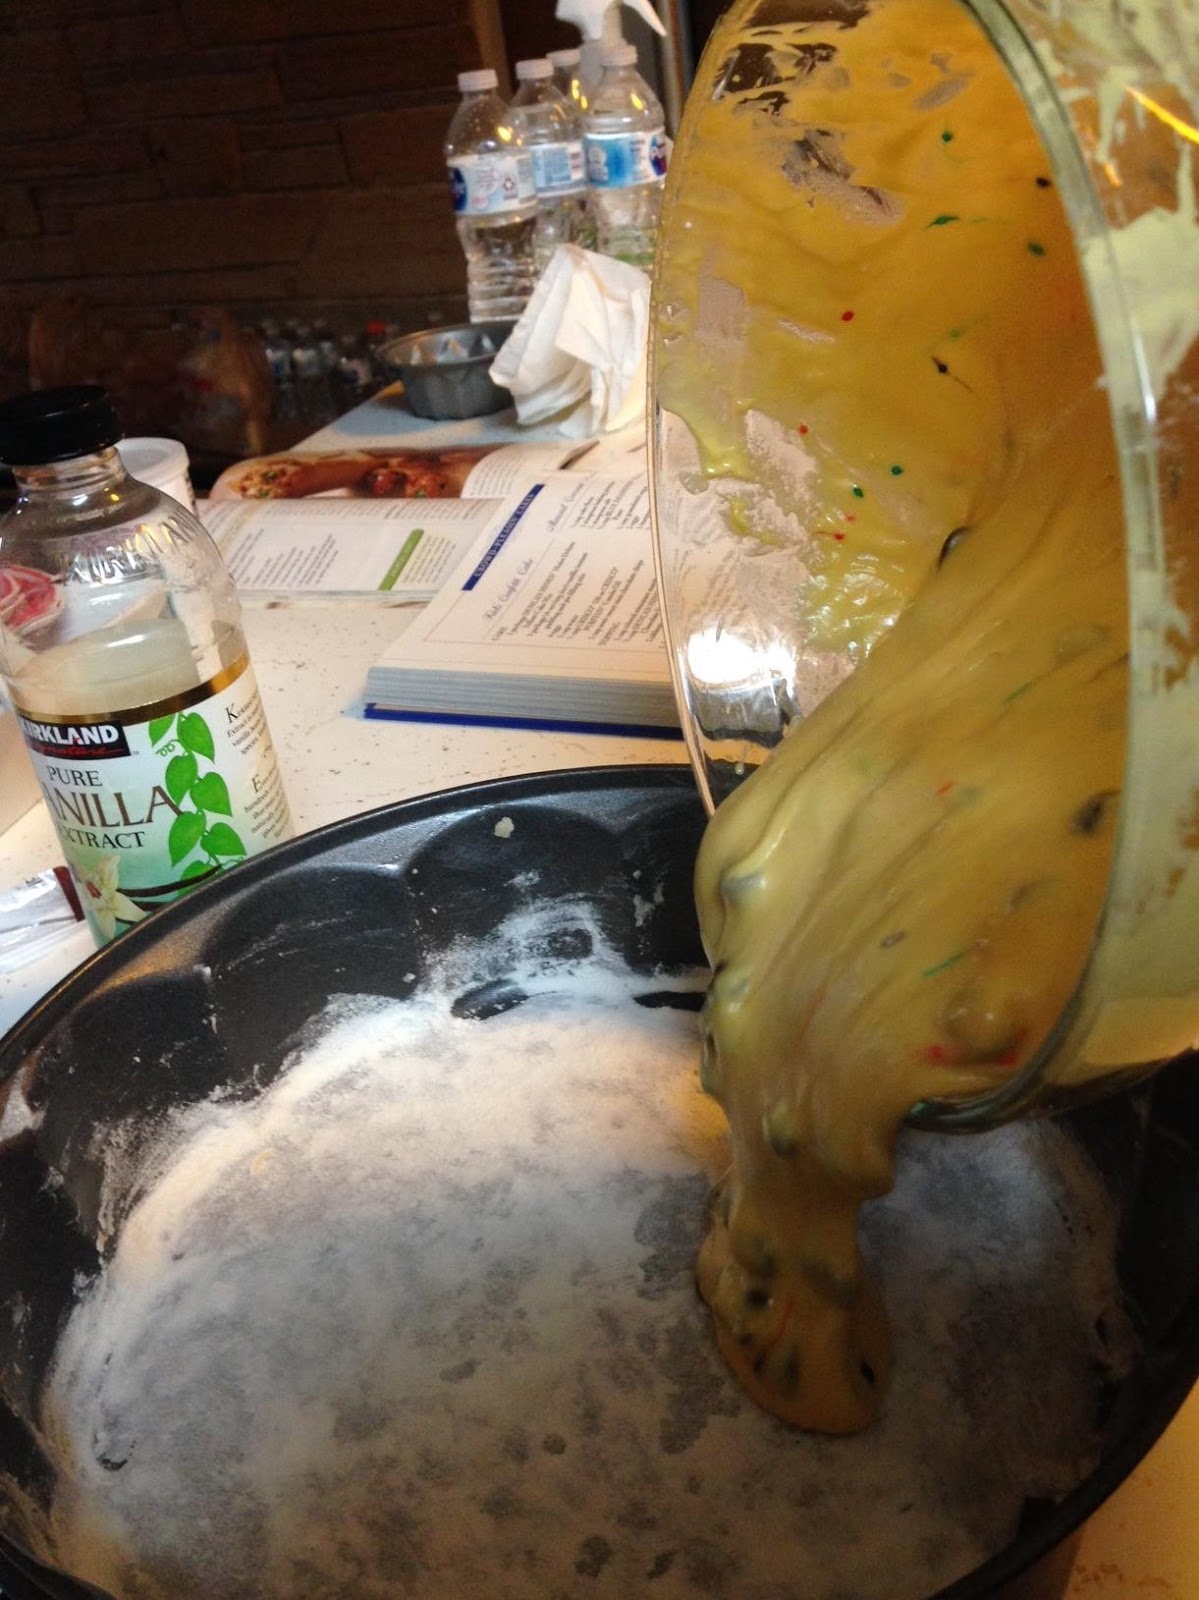
                 The most important part of baking is measuring out your ingredients precisely. By having a set of measuring spoons and a measuring cup can help you in lots of ways. By doing this, you will increase the quality of your finished product. To measure correctly, you use the spoon size according to the recipe and fill it to the top. To be precise, you can take a knife and level off the top
                                    Text Box: I learned from the book the importance of equipment’s in the process of baking and how they work together in order produce the best outcome of your masterpiece. How does the understanding of the importance equipment affects the outcome of your product?


Why Study Spanish?

Why Study Spanish?

Studying a language is obviously very important and even necessary for graduating high school. Learning a new language expands all of your opportunities for success throughout life and in all aspects of communication. In my opinion, studying Spanish is something I believe every student should do. "Over 340 million people who live in Spain, 18 Latin American countries, Puerto Rico, Equatorial Guinea, the Philippines and the United States speak Spanish. It is the second most common language in the United states and 3rd most commonly spoken language in the world" (Boyles XXX). After knowing this and already being enrolled in Spanish 1-2, I realized the importance of the class I was taking. There is so much to learning Spanish besides speaking. Learning this language involves me in understanding a new culture, expanding my soon-to-be career opportunities and to all in all enjoy and experience the culture surrounded by the Spanish language.

Spanish is key for understanding its culture. Language heavily surrounds and supports a culture, giving it a way for its people to communicate and share ideas. The world of Spanish-speakers is rich in food, art, literature, history and numerous traditions based on their fascinating culture (Boyles XXX). This allows you to learn about other cultures and helps you see other perspectives. After learning parts of a new language, everything after comes naturally in their culture, especially in literature and music.

Not only is Spanish truly interesting, but from what I have read, knowing how to speak Spanish is very helpful when getting a job. Businesses now-a-days are looking for employees that speak languages other than English. When workers can communicate with others in another language it widens their incoming customers, once they know they don't have to get a translator, etc. The amount of Spanish-speaking people within business is growing, so the employees have to too!

So far, learning Spanish, has introduced me to many possible opportunities. Clubs, projects, culture, and even daily homework, has been a good effect from this class. I believe everyone should take a language and especially Spanish because of its growing importance in the world.
What more could this language do in the World?
Boyles, Peggy Palo. Prentice Hall Realidades 1. Pearson Education, 2011. 

Master Chief (Halo) Minimalist

Minimalism is a term referring to those movements or styles in various forms of art and design, especially visual art and music, where the work of art is reduced to its necessary elements. This artstyle is almost always done on a digital editing software. For the aspiring digital artist, Peter Lourekas included a segment about this very style in his Visual Quickstart Guide for Photoshop CC.


Image result for minimalist artx

Without going into terms most won't understand, minimalist art is made of outlines and flat colors. Most minimalist art is based off existing character designs or stances. The art is made by outlining the entire subject and including only vital details- essentially, you make it as simple as possible. Now that the concept is explained, lets try to make some art of our own.   


For this project, we'll be creating a minimalist design of Master Chief using Photoshop. The plan is simple- make the outlines, color it, and then polish. 


First, we need a photo to base our work off of. While just about anything works, I'd recommend using photos with a higher resolution. The photo we'll use is the cover art for Halo 4. 


Image result for halo 4 cover
Now that we have a base, we'll need to decide what we'll want to use in the minimalist design. For now, we'll just stick with the foreground and a lightly detailed backdrop. In order to accomplish this, we'll need to get a background going. Adding some simple details in a moderately flat color works best for the style we're going for. Make sure to patch up the white, then lock the layer.


Now that we have the background, all we'll need to do is replace the silhouette with black. After doing so, we'll just need to smooth the texture and do a bit of polish. You may decide to add some lighting if your pose allows it. Once you're done, lock the layer. 


Next, we'll combine the two layers. Simple enough. After that, we'll include a basic border for presentation's sake. 
Looks nice! However, some people may prefer little something to give the eye to look at, especially when it comes to character portraits. The best thing to give your picture some focus with is some text. For this, we'll just add the Chief's name & designation.  
And we're finished! Some people may prefer the version without text, but both work. Now that you have the completed design, simply export into your desired file type and resolution. I'd advise that you export both the text-less and final versions to appease both preferences. You can do what you please with your art afterwards.

The American Red Cross First Aid & Safety: The Heimlich Maneuver

In my book "The American Red Cross: First Aid & Safety Handbook" I was taught and showed how to save a person's life by performing with rapid first aid for choking by doing abdominal thrusts, also called the Heimlich maneuver. My author Kathleen A. Handal explains that "choking is your body's way of trying to remove a foreign object (such as food) from the airway. A choking person's airway may be completely or partially blocked" (Handal 108). Without oxygen the brain can begin to die within 4-6 minutes. Some signs and symptoms of choking are grabbing of the throat with the hand, gagging, pale and bluish skin on face, weak, ineffective coughing; noisy breathing; high-pitched crowing sounds, convulsions and/or loss of consciousness.

"Choking is often associated with eating; alcohol consumption, trauma to the head or face, and young children" (Handal 108). Some warnings are:
  • DO NOT interfere if the victim is coughing forcefully and has good air exchange. However, be ready to act instantly if the victim's air exchange worsens
  • DO NOT pinch or choke an object that is lodged in the victim's throat. This might force it farther down the airway.

Steps to proceed with Heimlich:

First ask the victim if he or she is choking. If the victim can't answer, the obstruction is life threatening. Call EMS. Then tell the victim you are going to try to help and ask for permission to proceed.
1. Perform abdominal thrusts
2. Stand behind the victim
3. Wrap your arms around the victim's waist
4. Make a fist, place the thumb side of your fist in the middle of the victims abdomen, just above the navel and well below the lower tip with your outer hand
5. Grasps your fist with your other hand
6. Keeping your elbows out, press your fist with a quick, upward thrust into the victim's abdomen. Each thrust is a separate attempt to clear the victim's airway by forcing air out
7. Continue performing this maneuver until the obstruction is cleared or the victim loses consciousness


Have you ever been in a situation where you have almost or had performed the Heimlich maneuver, and what was the situation?

Learning The Basic Fundamentals of Sketching: Using Basic Shapes

Ever since we are little, we learn how to draw; though it may not be the best we still draw and sketch. Sketching and drawing are some of the ways we show our creativity. Using my creativity, I have decided to learn how to sketch. With sketching there are a few fundamentals that play a role in order to create various types of drawings. Most of those fundamentals have to do with shading. As Charlie Bowater in the Beginner's Guide to Sketching says " Light patterns, such as objects having light and shadowed areas, help when creating the illusion of depth on paper. Since you have your pencil in your hand, you can decide what other people see" (19).  When working with basic shapes and learning light patterns and shadowed areas have a big impact on how your sketch will turn out. With your creativity you can chose with what you would like people to see. I will take you through some of the fundamentals of shading using the basic shapes. First I drew a circle, oval, and square.
 Starting with basic shapes helps because you can make many variations and combinations. With these basic shapes you can elevate them into a sphere, cube and cone. When sketching Bowater recommends not use to much pressure (18).  Sometimes we have a tendency of putting a lot of pressure while we are trying to draw something out which can become hard to fix if you make a mistake while drawing.


Now as you can see in the pictures above I started with minimal pressure until I was done with sketching out my shapes and was pleased with my final shapes. From there start the basic fundamentals of shading. From the step above I went on to shade in my shapes. But before I shade I had to chose where I would want to highlight. Now highlighting is where the light hits your shape and those areas are the brightest. Once that decision was clear I started to shade in my shapes while making sure the areas I want the light to hit are brighter/lighter than the rest of my shape. With that came cast shadows. Because once you are done highlight/shading you want to know where the shadow of you object would lay. Cast shadows is an important feature because it can help make you object look as if it were actually placed on top of something and give it more of a 3-dimensional shape. I would recommend when you do this step to sketch out how you would like your shadow then shade it in. As Bowater states "the further a cast shadows is from the object which it casts it, the lighter and less defined the edges look" (19).  Using what Bowater said helps make that shadow of your shapes look more like a shadow than a mirror image.  The last fundamental is reflecting light. It is similar to highlighting and closely related. With reflecting light you take the the areas you would like to highlight and lighten it up making it seem more natural.
As you can see you can take an eraser and erase the small areas where the light reflects the most. You only want to erase small areas because the area around it have to gradually get darker making it so the light is focused on a specific area. Now with that said you can also erase edges as well were the light reflects as I did to the cube.

Using all those fundamentals that was my product.

 Do you agree with Bowater that you can make people see what you want them to see using shading techniques?

 Bowater, Charlie. Beginner's Guide to Sketching: Characters, Creatures & Concepts. 3DTotal Publishing, 2015.

A Dancer's Guide to a Stronger Core

One of the most contributing factors of dancing is strength. Most people see dancing as just moving your body to beats. However, dancing goes a lot deeper than that. There are technical moves such as turns that are apart of routines that dancers learn. In order to execute these moves well, you need to have strength coming from your core. I always heard about this but I never really considered doing workouts to gain the strength that is needed. Not having the amount of muscle I needed was holding me back from improving my technique. I started going to physical therapy for my hips, knees and back, in eighth grade and just recently got out. While I was going, I received a packet full of exercises to help strengthen my back. 

The following exercise is one I learned from my physical therapist that helps me work on my core. "This exercise is called the crunch (shown below)" (ATI, 3). To do this workout, you first need to lay down on your back on a flat surface. Then, bend your knees and either have your arms crossed across your chest or behind your head. Lift your shoulder blades off the ground and "crunch" your abdomen upwards, hold, then go back down. Repeat this until you feel like you've gotten the workout you need (ATI, 3). This exercise has helped me gain strength in my core, so I can improve my turning ability. 


Do you think that core strength has an impact on dancing?
ATI, PT. Strengthening Exercises.


 The process of become bigger, leaner, and stronger is a long and very tedious journey. To become bigger, leaner, and stronger you need to have a large amount of dedication, patience and effort. In the book Bigger Leaner and Stronger by Michael Matthews he explains that to even see dramatic results in your bodies physique, if working out very routinely and often it will take approximately 2-3 months. Another idea that Matthews explains is that to also get results correctly and in a timely manner, you must eat a high protein diet and focus on certain muscle groups each time you go to the gym. For example, say on Monday you do chest and abs. The next time you work out do shoulders and triceps/biceps and just get in a constant rotation of working out certain muscle groups. A quote that stood out to me was “Newbie gains” are very real and boil down to the simple fact that your muscles respond exceptionally well to just about any type of training for the first three to six months. Simply put, you can make all kinds of mistakes in the beginning and still make better-than-average progress. This doesn’t last long, though. Once the “magic” runs out, it’s gone forever, and what worked for the first few months won’t necessarily continue to work.”  (Matthews 115). This quote stood out to me because it explains what one of the hardest thing for people is when it comes to working out. They won't see results as fast as they would like so they will give up. I do agree with Matthews about how hard it is to stay persistent and make working out a daily routine.


In my personal experience what has been hardest for me is to stay consistent and to keep my determination. I have given up many times after about two weeks because I wasn't seeing any results, but now I have been in a steady routine of working out for around a month and I have seen major improvements already in my abs and chest.

Do you think you could have the determination to work out consistently for an extended amount of time?

Matthews, Michael. Bigger Leaner Stronger: the Simple Science of Building the Ultimate Male Body. Oculus Media Group Llc, 2015.


Ukulele: How to Get the Best Sound

Ukuleles can either sound good or they can sound pretty twangy. When I first started to play ukulele, I couldn't make the right sound. I knew that something must've been wrong but I wasn't sure what. I thought it might have been the pitch so I tried to tune it but after tuning it, it still didn't sound right. 

Barrett Tagliarino helped me realize that my hand placement was all wrong. He says that the strings should be strummed in the area where the neck meets the body (Tagliarino 4). I had been strumming with my hand over the sound hole when I should've done what Tagliarino stated in the book. Just by changing the position of my strum made the sound 10 times clearer and way more precise. 

Here is the first recording I made with my ukulele when my hand was in the wrong strumming position.


Here is the newest recording I have made with my ukulele on the same song with my hand in the right strumming position.


There is one exception for playing over the sound hole while strumming. According to Barrett Tagliarino, "Don't strum over the sound hole, unless your left hand is playing high up on the neck" (Tagliarino 4). When you play further from the sound hole with your left hand, the strings of the ukulele have less tension so it's easier to play and gives a better tone.

I have been practicing playing with the sound of the ukulele and exploring the ways I can use the sound hole and the placement of my strumming to better my skills in playing. 

Question to Think about: Do you agree with Tagliarino that strumming where the neck meets the body creates a clearer and stronger sound? Let me know in the comments below!

Tagliarino, Barrett. Play Ukulele Today! A Complete Guide to the Basics. Hal Leonard, 2006.

Kids Confetti Cake

                                      Kids Confetti Cake

Everyone may believe that baking or cooking in the kitchen may be had. In reality it's actually very simple unless you are doing something very complicated. I only complicate myself if there is a celebration. Parties are the time to show your baking skills. Here's a great recipe for a day when you and/or your siblings can do to show your skills to the family. 
The recipe is: 
Cake
- 1 package of yellow cake mix
- 1 package (4-serving) vanilla instant pudding and pie filling mix
- 4 eggs
- 1 cup of water
- 1/2 cup of canola oil
- 1 cup semi-sweet mini chocolate chips

Topping
- 1 cup of colored miniature marshmallows
- 2/3 cup chocolate frosting
- 2 tablespoons semi-sweet mini chocolate chips

Once you have everything ready you preheat the oven at 350 degrees Fahrenheit. It takes only a few minutes to make the cake mix. To make it you have to combine the cake mix, pudding mix, eggs, water, and the oil. You have to beat it at medium speed.


The difference between mixing and beating is a great one. Mixing means that you add a few ingredients at the time and combining them lightly. Beating is more intense, it requires a whisk or an electric mixer. Beating is used for cakes and toppings, while mixing it to make everything smooth.

After you beat it for 2 minutes you stir in a cup of chocolate chips. You grease and flour a baking pan. It can be any one that you choose as long as the cake will look good,  You pour it into the cake pan. You put it to bake for 40-45 minutes or until the toothpick that is inserted comes out clean.


Now for the topping, you immediately arrange marshmallows evenly over hot the cake. You place the frosting in a microwaveable bowl for 25-30 seconds, maybe even less. You stir it until it's smooth. You drizzle it evenly over the marshmallows and the cake.

Now in the book it says, "Use a spoon or fork to drizzle melted chocolate over cookies, bars, cakes and breads" (6). This means that you slowly put the chocolate on the cake and marshmallows, which is what I did and it worked out greatly. It also says that you can put the chocolate in a Ziploc bag and cut off a corner to squeeze out the chocolate in a pattern if you want to (6).

Now this is how the cake turned out. It looks great and tastes great. I hope you all try it out!


Which way do you guys believe would be better to drizzle the chocolate: with a fork/spoon or a plastic baggie?

Ross, Peter Dean, illustrator. Favorite Brand Name Bake Sale Cookbook. Louis
     Weber, 1997.


Ball bounce animation: the power of squash and stretch

Basic Principals of Animation

Richard William's Animators Survival Kit constantly stresses the importance of "squash and stretch" in all your work. Squash and stretch is the practice of exaggerating your work beyond what might be realistic, and it is commonly practiced by almost all animators. The image below, taken from the
Image result for squash and stretch disney
book, is an example of squash and stretch. To take this principle a step farther, Richard William (director of Who Framed Rodger Rabbit and author of The Animator's Survival Kit) advises you to have contact in the animation before the squash (94). This is a great practice because "...we're getting more 'change' - more contrast - straight lines playing against curves... We can use straight lines and still get a lumber result." (Williams 95). I tried this method out myself with a simple ball bounce, letting the ball make contact with the 'ground' before stretching it out. (The video is above).

Does adding contact before exaggeration make that big of a visual difference on the animation? 
Coplin, Ansleigh. Williams, Richard. The Animator's Survival Kit. Farrar, Stratus and Giroux, 2009.

Learning new ways to Draw

I'm somewhat familiar with drawing or sketching things, I never have just taken time out and decided to draw something but after I found the book called Drawing for the absolute beginner by Mark and Mary Willenbrink. I'm only 40 percent into the book and I've learned so many skills and found out how there are different ways to draw a subject.

There are sketches where yo draw lines to frame the subject just right and even, then value sketches which I tried out where you basically use dark and light pencils to contrast the black and white and create lines without lines. "A value sketch is used to observe a subject without much regard for structural or proportional accuracy" (Willenbrink 18). Mark says that this type sketches help the subject be visible without lines.


Do you think that this type of sketching is more appealing than a sketch with lines and structure?


Willenbrink, Mark, and Mary Willenbrink. Drawing for the Absolute Beginner: a Clear & Easy Guide to Successful Drawing. North Light Books, 2006.

Does origami benefit your mental health?

Can folding a piece of paper benefit your mental health?

When most people think origami they usually think of origami as a fun activity to do when your bored, but what they don't know it that doing origami has many benefits. Origami provides both mental and physical  with exerciseOrigami helps develop hand-eye coordination, fine motor skills and mental concentration. The author Jeremy Shaffer says that the first stage of origami is to decide what to fold, one must come up with idea that practical and realize the importance of concentration, dedication, and creativity (20).  The paper craft of origami has so much thought and  process behind the making and directly stimulate your brain.


Paper folding challenges me to higher level as I follow instructions, learning new skills and activities."More difficult than coming up with the new ideas is actually folding them. Although this requires awareness, a lot of designing ability comes through experimentation and experience following diagrams"(Shaffer 15).  the author explaining that every fold has a perplex meaning and shows your ability of learning new skills. paper-folding allows me to create basic shapes such as squares, rectangles, and triangles.

Do you agree with Shaffer point of views on origami?

Shaffer, Jeremy. “Origami to Astonish and Amuse.” Amazon.com, 6 July 2001, www.amazon.com/Origami-Astonish-Amuse-Jeremy-Shafer


The Art of Caligraphy

The Art of Calligraphy 

For people like me, that are not so good with art, calligraphy seems like something only a professional can do.  But it's actually not that hard!  Calligraphy is super easy if you know how to do the simple basics.  To learn the beautiful and unique art of calligraphy I used the "Complete Calligraphy" set by Hinkler.  Everything you need will be included in the set.  But the first step is learning how to correctly hold a calligraphy pen!

 Unlike a normal pen or pencil, a calligraphy pen has a certain technique to it and requires you to hold it a certain way.  The back of the pen shouldn’t be facing towards you or go towards to one of your shoulders.  It should seem like it's going right past your shoulder at a 45 degree angle (Bennet 56). When you’re holding your pen try to imagine that the pen is going past your shoulder.  This will guarantee that you’re holding your pen correctly.  This also helped me because at first I was holding the pen the same way we all hold a pencil, this was making my letters come with no dimension that italic letters come with.  But as I kept practicing and fixing my mistake, my letters got more and more better. Another way you can make sure you are holding you pen correctly is by making a V letter.  One side of the V letter should be a  thick line and the other side should have a thin line because of the angle in which you're holding the pen at (Bennet 57).  This method helped me not only to get used to holding the pen correctly, but also introduced me into writing/drawing with the pen. 


To make your skills of using the pen precise and prefect requires practice.  Try to draw a "+" sign.  If the pen is held correctly at a 45 degree angle, then both the horizontal and the vertical lines should end up to be the same.  The beginning tips of the vertical and the horizontal lines should have a slight slant to the beginning and ends. 

In order to start creating beautiful italic letters, you need to draw two lines.  Inside these two lines will be where you will actually writing the letters.  "The spaces between the guide lines are equal for the Italic alphabet are equal to five peri widths..." (Bennet 58).  Five peri widths make up a nib width which is basically the height or the gap between the two lines.  To draw a nib width, you have to draw a small horizontal dash or mark.  On top of this line that you just drew, draw another one stacked upon it diagonally.  Repeat this step until you have drawn five lines that are diagonally placed on each other.  Finally, draw two horizontal line that go to the end of the paper with a piece of pencil.  You should draw the first line starting at the top of the nib width and the second one starting at the bottom of the nib width.  Now you’re ready to start writing!
While writing the letters inside of the two lines you just created, the tops of the letters should go just slightly above the top line so it looks like the top of the letter is sitting on the line (58).  For letters such as g, j, and y, the bottom part of the letters should go below the bottom line, just like when you are writing normally with pencil and paper.  For now, getting the pen technique and writing the letters is the most important.  Next will be how to properly format the letters that you are going to be practicing to wright.  Are you willing to try the gorgeous art of calligraphy yet?


Bennett, Jim. Calligraphy for Dummies. For Dummies, 2007. Print.

Drawing Space With Character: Character Design From Life Drawing

When drawing characters or people in general, volume is always a key. Volume can make the character look real on the paper with just a few correctly placed lines. Michael D. Mattesi says this, "I believe that the well-rounded draftsperson has the capacity to understand how to draw depth and understand the flat plane of the page at the same time. No matter how well you can depict perspective, form, light, etc., there is real power in understanding that you are still working on a two-dimensional surface" (37).  For me this means that anyone can draw depth and still know that it's a flat piece of paper. 

When trying it out for the first time I used it to make a circle with depth, or a sphere. without the lines in the middle of the sphere it would just look like a regular sketched circle. "...Look how deceiving some simple curves can be on this..." (37). This sphere can also be the start of some head sketches along with a body. 


The second thing that I tried was playing with depth boxes. Depth boxes can be used when making sketches of body parts or anything else that are in different depths. The objects or parts closer to your perspective should be bigger than the objects that are farther away. This grants the illusion of the object being closer or farther on the paper. I attempted to draw a fist coming toward the paper, with the arm in the background. 

Mattesi gives some advice and says, "Look at the bounding boxes around the different areas of the figure [that you are drawing]. In the beginning, do this with realistic purpose. For instance, a foot that is closer to you would be larger than a foot farther away... This happens because of the roundness of our eyes" (44) 


Beginning the Journey of Calligraphy

Many people, myself included, look at calligraphy as a complicated form of writing, something we will only see in our Pinterest boards and YouTube videos of organized notes and DIY's. But, the truth is, we are all just one step away from becoming beautiful artists who have mastered the art of calligraphy ourselves. For my journey, I will be using the "Complete Calligraphy" set by Hinkler, which includes: a book, a pencil, kneadable eraser, a calligraphy pen, 4 nibs, 2 marker, 6 cartridges of ink, 2 metallic calligraphy markers, and a T-square.


Since I've never done calligraphy before, I started with what is known as one of the simplest styles for calligraphy: Italic. The point of teaching the italic alphabet to beginners is so we will learn how to get the pen angle for calligraphy right, and understand how a calligraphy pen is different from a normal pen. Since we learn that the angle must stay consistent, Bennett tells us to hold the pen in one consistent position and move the paper, not your hand or your arm. This will ensure a uniform angle throughout your writing (56). I started off by perfecting my pen angle before I started my letters. So, I made sure that I didn't move my position, and as I got better and better at it, I achieved a uniform angle.  The book provided some practice that showed me how to get my angle right. Although it was hard at first, I kept readjusting the pen, paper, and what position I was in to make sure I got the angle down, before I moved on to doing more complicated things, such as the alphabet and words.


After I got my pen angle right, I moved on to the actual letters. This book told me to make sure my proportion according to the width of my pen was right, I had to, "...turn the pen sideways and make five little marks, one on top of each other like a stack of little bricks" (Bennett 58). So, I started off by tracing, and then writing with dashes so I would write in straight lines. I got through three lines of the alphabet before I stopped using lines, and used the five dashes throughout my whole alphabet, until I thought I got the proportion right.


Bennett said that I should not have curly serifs, which are the “tails” at the ends of letters (59). I refined my serifs, and practiced the alphabet a couple more times until I did not need dashes or lines at all, and this is what my final product looked like:


After reading this post, do you feel as though you can now tackle calligraphy? Why or why not?


Bennett, Jim. Calligraphy for Dummies. For Dummies, 2007. Print.

The Funk Masters - In Drumming

The Evolution Of Funk

James, James Brown, one of the most iconic influencers of Hip Hop, R and B, and Funk. Though he's one of the most memorable singers around, even himself had to start some where. Fortunately I have been able to purchase a book on him and his burnout of a Rhythm Section, breaking down his history and style music. One of the first Bands James joined was the Gospel Star lighters ,"The first noteworthy band that James Brown was a part of was the Gospel Starlighters (AKA the Avons), a seven-piece rhythm and blues group led by his lifelong friend and musical partner, Bobby Byrd." (Dr. Licks 9). One of the first songs presented in this book is "Think". I will be playing the drum part Nat Kendrick created with somewhat of a swing yet straight feel."Eighth notes are usually either swung or they're played straight. In this song, Nat placed his eighth-note feel in that nether world where it's somewhere in between."(Dr. Lick 13).


With James Brown being on of the greats with his rhythm section I want to leave you with a question In Mind: Where have you have heard many of his famous drum licks and drum feels in Music today?


Dr. Licks. The Great James Brown Rhythm Section. Manhattan Music.

How To be Totally Miserable: A Self-Hinder Book

         
             John Bytheway puts it simply when he says this, "We all have problems, but we also have choices. We can choose to be happy, or we can choose to be miserable." (1). I believe free agency is the most amazing gift that we have here on earth. We can choose to do anything we want, any good or bad and accept the consequences of those actions. Life is one large choice. And it always has been. 


         For the next quarter, I'm going to be learning "great lessons to be learned about feeling rotten..." (Bytheway 1). However, on the way, I might just find myself going in the other direction. 
  
         I like to think of myself as a primarily happy person, I enjoy the little things in life and I try to stay this way through everything. The key word in that is *try*. However, I am going to again *try* to make my most-of-the-time (sometimes) happiness an: all of the time happiness in the purest form. 

        John Bytheway gives some interesting advise when he says, "In order to be miserable, you're going to have to spend a lot of time thinking about your problems...The happiest people think their thoughts according to a plan, and in order to be miserable, you've got to have a plan too-plan to ignore all of your wonderful opportunities and ponder only your problems." (7) Recently, I was given the opportunity to go to my absolute favorite place on planet earth: Disneyland. (What's your favorite place to go?) I think for everyone, we have different things in our lives stressing us out and we all need some time to just forget about all of those things weighing down your shoulders. And, for everyone, there is a different place that we all have weather it be a specific spot in our own house or a place in the middle of Ireland. Where ever that place may be, try to make time for yourself and go there every once in a while just to take a deep breathe and get away from the stress of the world around you. 

       Anyway, I went to Disneyland about a week ago and it was exactly what I needed to follow Bytheway's request. Finding pure happiness is in no way easy, and I am definitely still at the beginning of the race. 
         
                     "Whenever he thought about it, he felt terrible. And so, at last, he came to a fateful decision. He decided not to think about it" 
                                     - John-Roger and Peter McWilliams 
                            (( What do you do to make you the most happy?))
-Julyn Robinson